You've probably seen it already. The north-facing weatherboards are fading, the lower boards stay damp after rain, and a few bubbles have appeared near the window trim. The last repaint may still look acceptable from the street, but Auckland's coastal weather can be working underneath the film long before obvious peeling begins.
Choosing house paints for exterior surfaces on the North Shore isn't just a colour decision. Rainfall, humidity, salt exposure, sunlight, substrate movement, and preparation quality all affect whether a coating remains flexible and well bonded. The right approach is to specify a complete system, primer, topcoat, finish, and maintenance plan, for the actual surface and exposure zone.
Why Auckland's Climate Demands More From Exterior Paint
A north-facing wall can fade quickly, while a shaded lower elevation stays damp after rain. Auckland's exterior paint has to handle approximately 1,240 mm of annual rainfall across about 186 wet days, average relative humidity of around 78%, and summer UV index values reaching 14, classified as extreme. These conditions create repeated wet-dry cycling, timber movement, and faster binder breakdown from sunlight, as the Auckland climate assessment explains these exterior paint stresses.
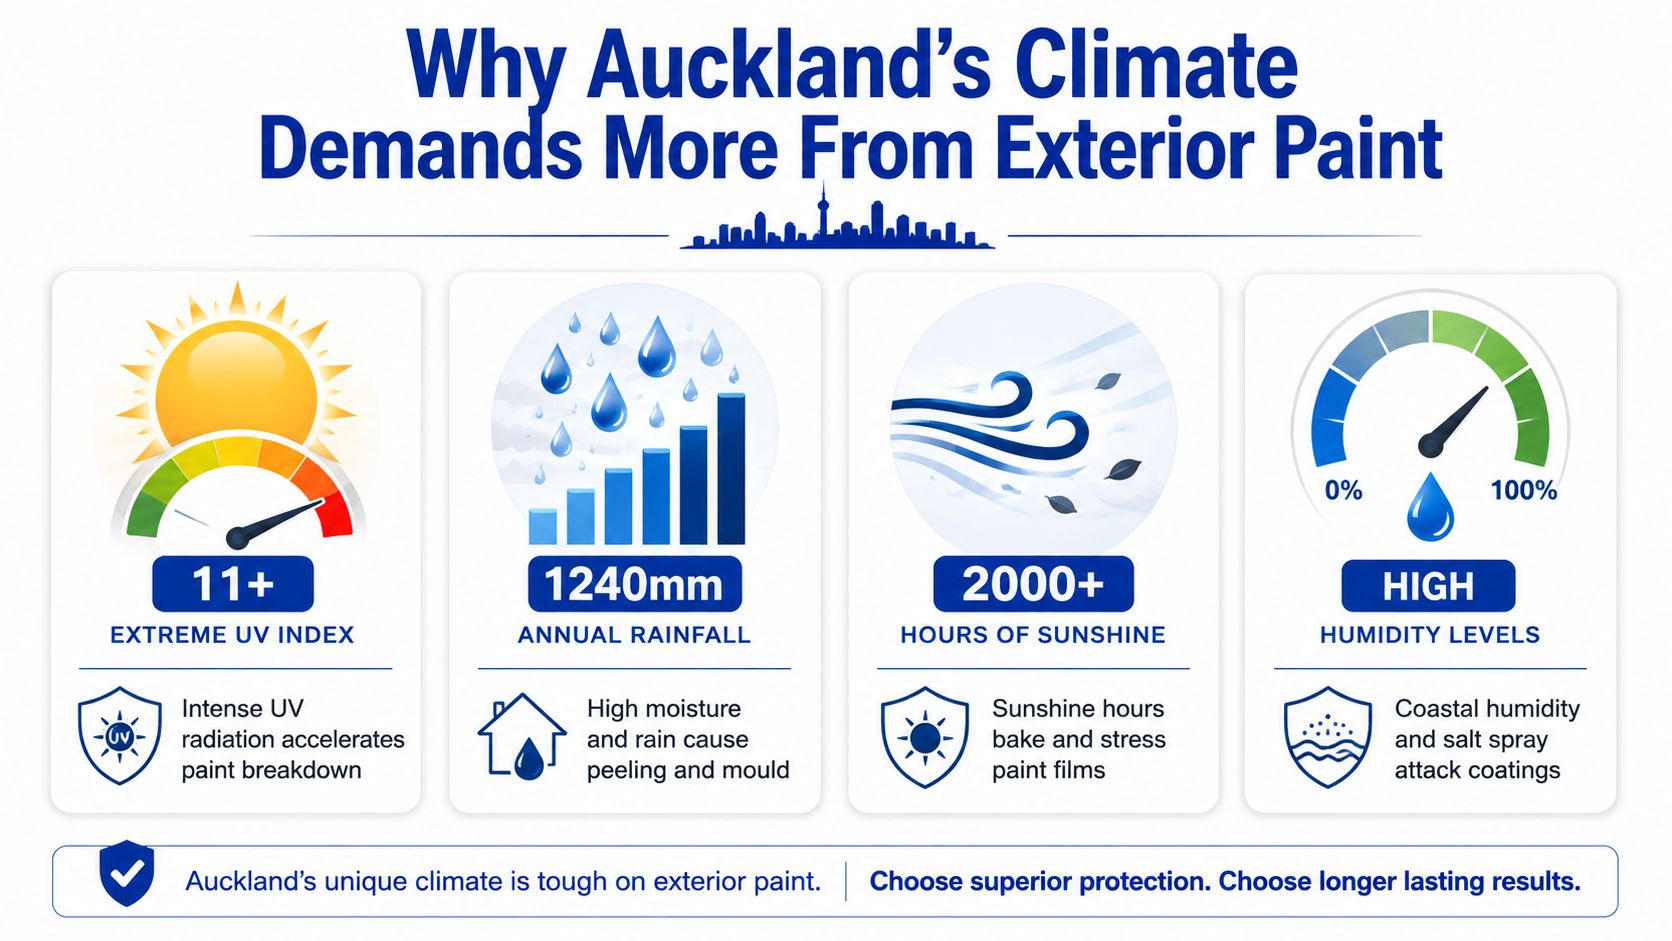
The exposure zone matters as much as the product. North- and west-facing walls receive stronger sunlight, while windward coastal elevations take more rain and salt. Sheltered walls may retain a coating longer, but they can still develop mould where airflow is poor. Product selection should therefore follow the wall's orientation, proximity to the coast, and the substrate beneath it.
Timber expands as it absorbs moisture and contracts as it dries. A rigid or poorly bonded coating is most likely to fail around joints, nail holes, end grain, and repaired sections. Plaster and masonry bring different risks. Moisture can pass through porous areas or small cracks, then press against the coating from behind. Salt carried in coastal air adds contamination that can weaken adhesion unless the surface is thoroughly washed and prepared.
UV and moisture attack different parts of the system
UV radiation breaks down the binders holding pigment and other ingredients together. Fading, chalking, and a dry, powdery surface follow. Moisture then enters through weak points, contributing to blistering, peeling, mould growth, and loss of adhesion.
These stresses work together. Sunlight makes the film brittle, while moisture changes the dimensions of the substrate and enters through defects. The same exterior paint may remain sound on a sheltered wall and fail sooner on a north- or west-facing façade.
Practical rule: A premium paint cannot compensate for damp timber, salt contamination, unstable old paint, or an unsuitable primer.
For North Shore homes, exterior painting is a maintenance strategy rather than a colour-only decision. Preparation and the correct coating system help limit water entry, protect cladding, and prevent small defects becoming larger repairs. Advice on exterior painting in New Zealand should be applied to the property's orientation, nearby vegetation, wind exposure, and substrate condition.
A typical Auckland repaint cycle is reported as 7 to 10 years with quality paint and proper preparation. Coastal or highly exposed properties may need attention closer to 5 to 7 years. These are planning ranges, not guarantees. Inspect windward elevations, joins, and areas that remain shaded or damp before choosing the next system.
Understanding Paint Chemistries and Primer Systems
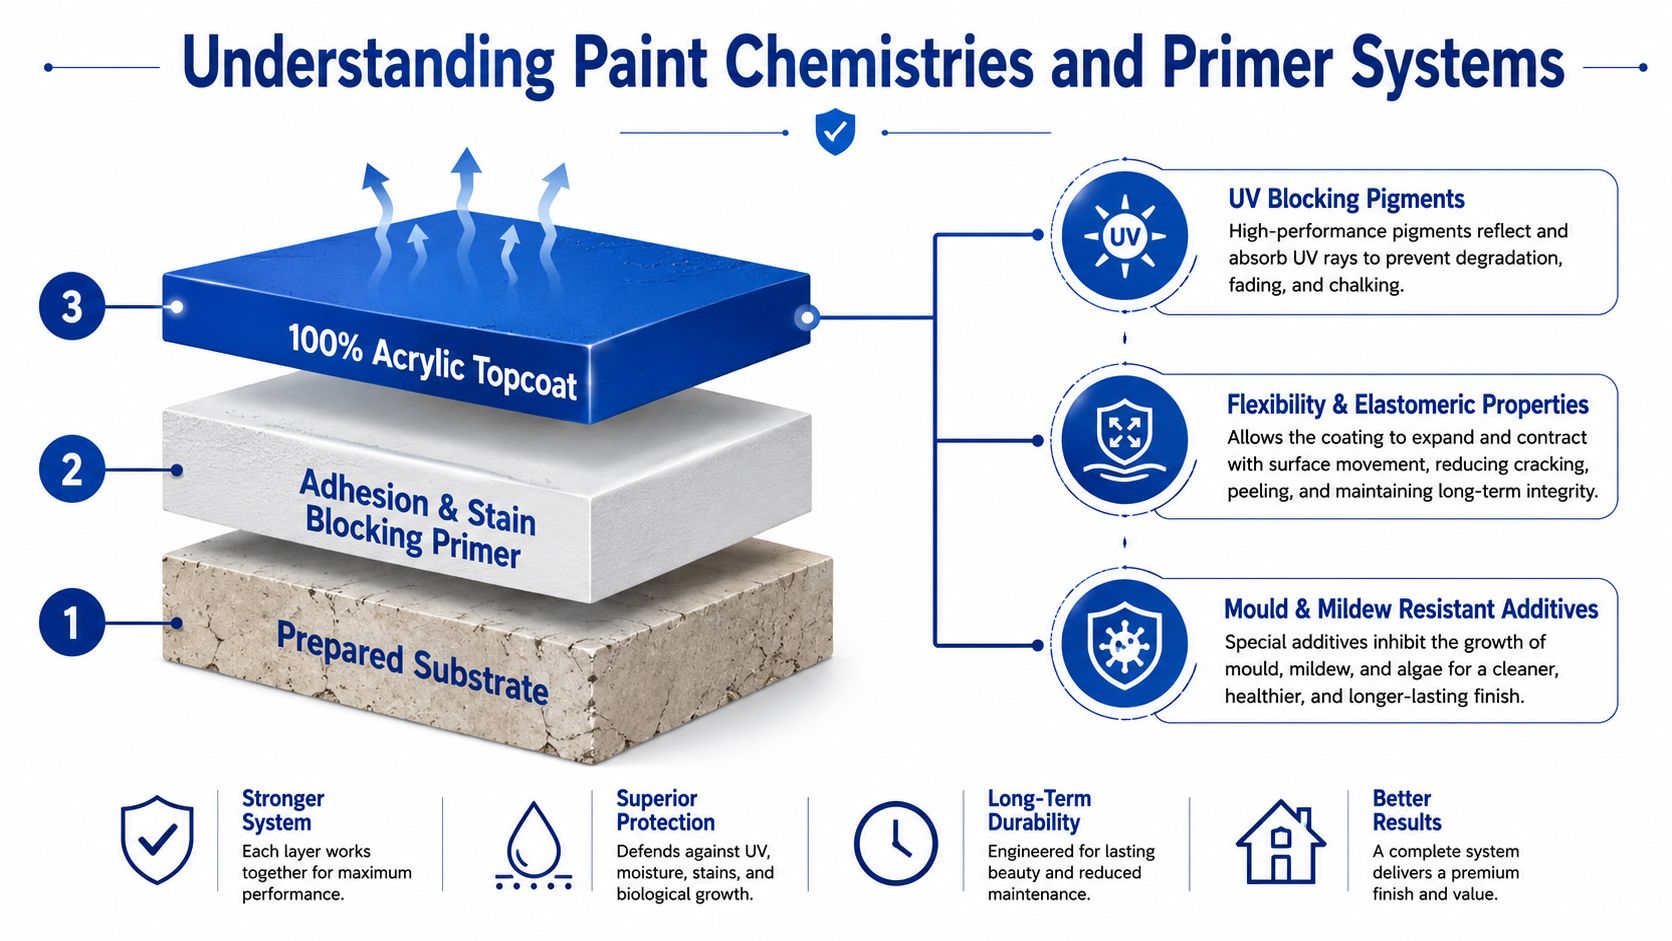
An exterior paint job is a layered system, not a bucket of colour. The substrate must be clean and stable, the primer must solve the surface's specific bonding or staining problem, and the topcoat must withstand movement, moisture, and sunlight.
Why acrylic topcoats are commonly specified
For exposed Auckland exteriors, a premium 100% acrylic topcoat is a practical starting point. Acrylic films can provide strong UV resistance and enough flexibility to accommodate ordinary movement in timber and other substrates. Look for product documentation covering exterior use, adhesion, weathering, flexibility, and mould resistance rather than choosing by colour range alone.
Acrylic paint still needs a sound base. It won't reliably hold loose paint, chalk, greasy residue, or salt. It also won't stop moisture entering through an unsealed joint or defective flashing. The coating performs only as well as the surface beneath it and the conditions during application.
Primer selection depends on the substrate
Primers have distinct jobs, so they shouldn't be treated as interchangeable sealers.
- Plaster and cement-based surfaces: An alkali-resistant primer helps manage the chemical character of new or porous masonry surfaces. The plaster must also be adequately cured and dry before coating.
- Cedar: A penetrating primer or compatible stain system helps manage absorption and timber movement. Cedar can also release extractives, so the specified product must suit the timber and chosen finish.
- Weatherboard: Bare timber, filled nail holes, and repaired patches need priming before the finish coats. Where tannin or other staining may bleed through, use a suitable stain-blocking primer rather than relying on the topcoat.
- Brick: A breathable masonry-compatible system is generally preferable to a coating that traps moisture. The wall must be checked for dampness, salts, and defective mortar before painting.
New Zealand ecolabelling criteria set VOC caps of 50 g/L for many exterior low-sheen and flat paints, 60 g/L for semi-gloss, and 65 g/L for gloss products. The Eco Choice Aotearoa paint criteria outline these VOC limits. Water-based acrylics can still contain VOCs, so check the product label and technical data rather than assuming “water-based” means VOC-free.
The cheap option is usually the wrong layer, not just the wrong brand. Saving on primer while applying an expensive topcoat leaves the system vulnerable at its weakest point.
A quote should identify the preparation method, primer type, number of finish coats, and product system. If it only says “two coats exterior paint”, you don't yet know what you're buying.
Choosing the Right Paint System for Each Substrate
North Shore homes commonly combine several exterior materials, and each one presents a different failure risk. Weatherboard needs movement tolerance, plaster needs alkalinity and moisture control, cedar needs careful management of absorption and extractives, and brick needs a coating that doesn't create a moisture trap.
Weatherboard
Start by locating the failure points rather than rolling over them. Nail pops should be secured and filled, cracks should be opened and repaired with compatible flexible materials, and damaged timber should be replaced or stabilised. Sanding creates a sound edge between old and bare paint, while primer seals exposed timber and repaired areas.
A flexible acrylic topcoat is usually more forgiving than a brittle film on moving boards. Pay particular attention to end grain, joins, window surrounds, and lower boards where splashback keeps the surface wet.
Plaster
Plaster needs a stable, clean, dry surface and a primer suited to its alkalinity and porosity. New plaster shouldn't be coated just because it looks dry on the surface. Curing and moisture conditions must be checked, especially where the wall has cracks, patch repairs, or a history of bubbling.
Cedar
Cedar can be finished with a penetrating oil stain or a film-forming paint system. Penetrating stains preserve more of the timber character and avoid some of the peeling associated with failed surface films, but they require ongoing colour and protection maintenance. Painted cedar provides a different appearance and can offer a uniform architectural finish, though it demands careful priming and edge treatment.
For readers comparing masonry approaches internationally, this guide to paint for stucco in Utah offers useful background on how substrate behaviour influences exterior specification, even though Auckland's moisture and coastal conditions require local judgement.
Brick
Brickwork needs moisture assessment before colour selection. Check for damp patches, efflorescence, failed mortar, and areas where water is entering from copings, flashings, or roof details. Use a masonry-compatible, breathable system and avoid treating paint as a substitute for repairing the source of moisture.
| Substrate | Primer Type | Topcoat Recommendation | Key Consideration |
|---|---|---|---|
| Weatherboard | Timber primer, with stain-blocking primer where required | Flexible exterior 100% acrylic | Repair movement points, cracks, nail holes, and end grain |
| Plaster | Alkali-resistant, masonry-compatible primer | Breathable exterior acrylic suitable for plaster | Confirm curing, dryness, and crack stability |
| Cedar | Penetrating timber primer or compatible stain base | Penetrating oil stain or suitable acrylic system | Choose between timber character and a film-forming finish |
| Brick | Breathable masonry primer | Masonry-compatible exterior coating | Manage moisture and salts before painting |
The same principles apply when choosing paint for a house across mixed surfaces. A single product may cover the colour specification, but it doesn't necessarily provide the correct primer or surface preparation for every elevation.
How Exposure Zones Affect Repaint Timelines
A repaint schedule based only on the calendar can give Auckland homeowners the wrong expectation. Two North Shore houses may use the same coating yet weather at very different rates because their elevations receive different levels of sun, rain, wind, and salt. Resene maintenance guidance places first-maintenance expectations anywhere from 15 years down to 2 years, depending on exposure. The New Zealand maintenance guidance explains why exposure changes coating intervals.
Read the elevations, not just the calendar
Technical guidance identifies UV light, moisture, then heat as the main environmental drivers of paint weathering. The building-painting durability guidance identifies these environmental drivers. Auckland's high UV, frequent wet weather, and coastal salt make orientation and shelter practical parts of the repaint decision. North- and west-facing walls commonly show fading, chalking, or cracking first, while windward elevations can receive more driving rain and salt-laden air.
Check each elevation for:
- Coastal exposure: Does the home receive direct sea winds or persistent salt air?
- Orientation: Are north or west walls deteriorating before the rest?
- Shelter: Do fences, nearby buildings, or mature planting protect particular walls?
- Height and wind: Are upper levels, eaves, and roofline details exposed to stronger weather?
- Moisture sources: Are gutters, downpipes, decks, or ground levels leaving sections damp?
A sheltered property may sit within the commonly reported 7 to 10-year repaint range. Coastal or highly exposed homes may need attention around 5 to 7 years, while some protected properties can approach 10 to 15 years when preparation, substrate, coating, and exposure are all favourable. The New Zealand exterior-paint guide describes these exposure-based ranges.
Inspect by condition, not by age. Chalking on your hand, open joints, peeling edges, bubbling, and soft timber are more useful warning signs than a calendar date.
Separate routine maintenance from a full repaint. Washing, resealing joints, repairing a leaking detail, or touching up a vulnerable elevation can delay wider coating failure. Leaving defects until every wall peels usually means more preparation, more repair work, and a narrower window of suitable weather.
Selecting Finishes and Colours That Last
Finish selection affects both appearance and maintenance. Low-sheen coatings are often forgiving on broad exterior walls because they reduce glare and don't highlight every minor surface irregularity. They can suit weatherboard and plaster where a softer appearance is preferred, provided the product is rated for exterior exposure.
Semi-gloss offers greater washability and a sharper appearance on trims, doors, window surrounds, and other details. Gloss can be effective on selected joinery or accent areas, but it reflects more light and reveals dents, sanding marks, uneven filler, and rough timber. The right finish depends on the surface condition, not just the desired level of shine.
Colour needs to work with the elevation
A colour that looks balanced on a sample card can change markedly across a North Shore home. Roof colour, trees, neighbouring buildings, reflected light, and the direction of the wall all influence how the finish reads. Darker colours absorb more heat, which can increase movement and coating stress on sun-exposed timber, particularly on north-facing walls.
That doesn't rule out deep colours. It means the substrate, product system, and exposure must be considered together. A dark trim may be a sensible choice on a protected porch, while the same colour across a highly exposed weatherboard elevation may demand more careful maintenance planning.
Test colour on the actual surface before committing. Paint sample areas on more than one elevation, view them in morning and afternoon light, and check them against the roof, fascia, windows, paving, and landscaping. For a cohesive exterior, choose the cladding colour first, then coordinate fascia, bargeboards, joinery, doors, and garage doors rather than selecting each colour in isolation.
A colour consultation can save more than aesthetic regret. It helps align the palette with the home's architectural style, surrounding environment, natural light, and the amount of maintenance the owner is prepared to accept.
What a Preparation-First Painting Workflow Looks Like
On a North Shore home, the coating system cannot compensate for salt, mould, damp timber, or failing paint left underneath it. Preparation determines whether the new coating bonds to the building or just hides yesterday's problems. Skip that work and the finish may look tidy at handover, then blister or peel after moisture and strong sunlight return.
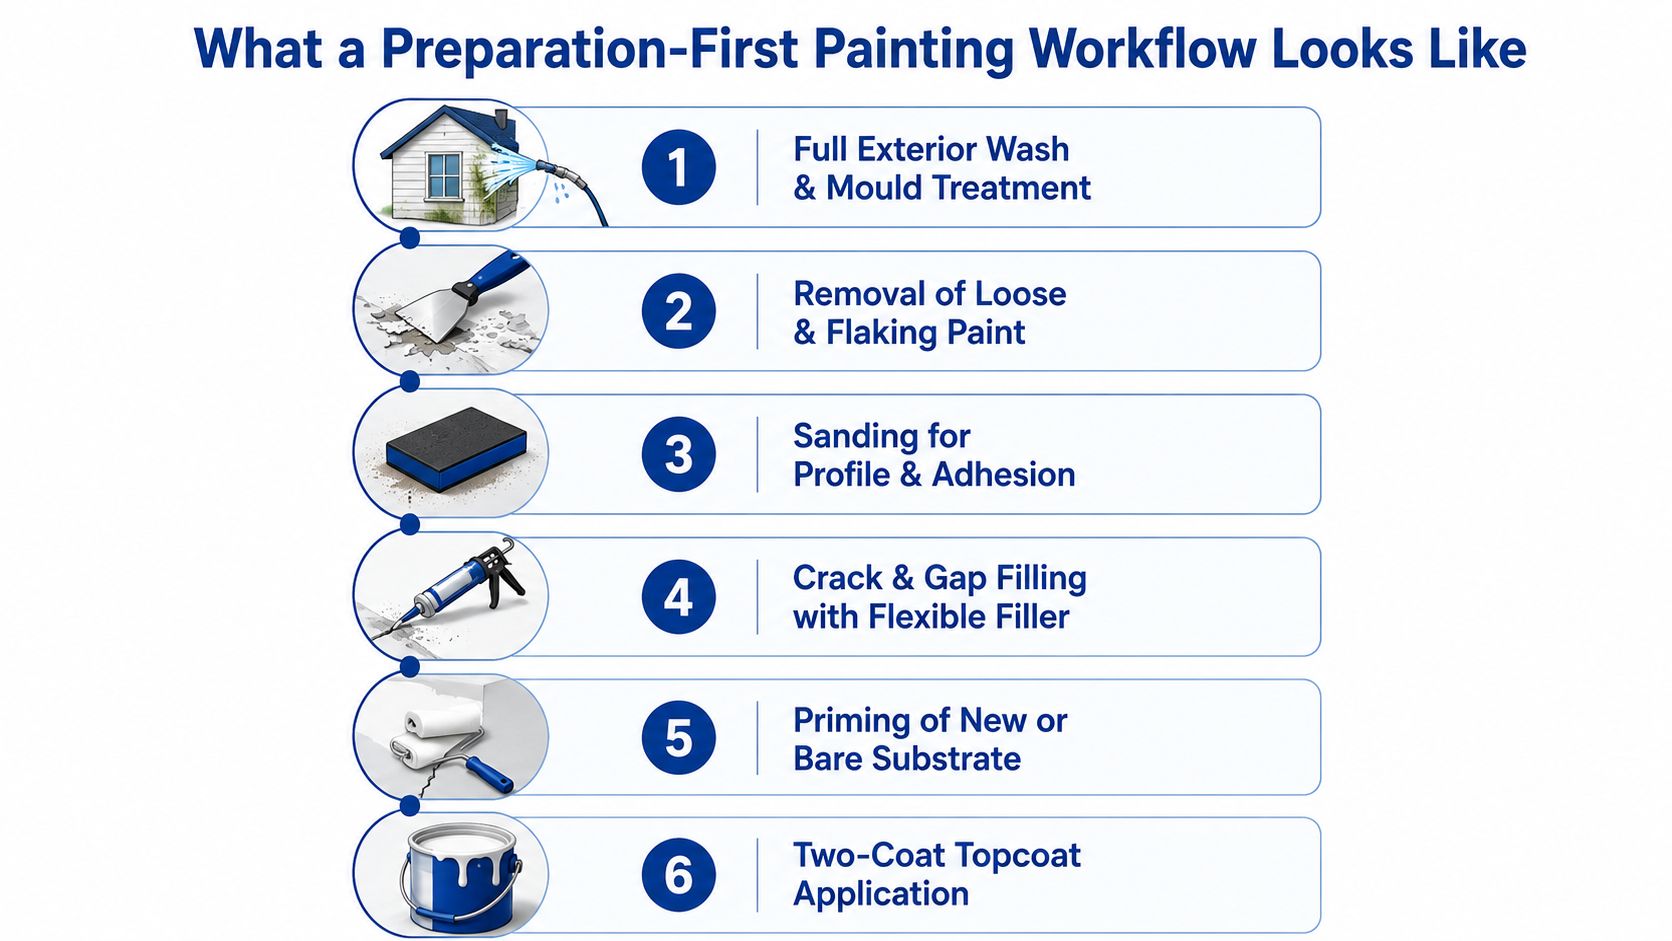
The sequence matters
- Wash and treat the exterior. Remove dirt, salt, algae, mould, and loose contamination. Rinse thoroughly and let the surface dry.
- Scrape unstable paint. Remove flaking edges and weak layers. A new coating cannot stabilise loose material beneath it.
- Sand for adhesion. Smooth the transition between sound and scraped areas, while creating a suitable profile for primer and topcoat.
- Fill cracks and gaps. Use compatible flexible filler or sealant at joints, trims, and penetrations. Rigid repairs often crack as timber moves.
- Prime bare and repaired areas. Exposed timber, plaster patches, filled sections, and other absorbent areas require the primer specified for that substrate.
- Apply the specified topcoats. Keep coverage consistent and follow the product's drying and recoat requirements.
The tools depend on the surface and its condition. Low-pressure washing, mould treatment, scrapers, sanding equipment, flexible sealants, brushes, rollers, and spray equipment may all have a place. Masking protects windows, roofing, paving, fixtures, and nearby finishes from overspray and unwanted brush marks.
For a closer look at the wall preparation process, this video shows the work visually:
Weather controls the programme
Topcoating requires a dry substrate and a suitable weather window. Auckland painters must account for damp mornings, rain, heavy wind, cool evenings, and salt-laden air rather than forcing the programme to meet an arbitrary date. Washing, repairs, priming, and topcoating may need separate windows.
Before accepting a quote, ask:
- What preparation is included? Washing, mould treatment, scraping, sanding, filling, and priming should be described.
- Which primer matches each substrate? Weatherboard, plaster, cedar, and brick may need different systems.
- How will dampness be checked? The contractor should explain how surfaces will be confirmed ready for coating.
- What happens to failed details? Clarify responsibility for rotten timber, open joints, cracked plaster, and defective drainage.
- Which product system is specified? Request product names and technical data, not only “premium exterior paint”.
A preparation-first quote makes the sequence visible. That is the clearest way to compare workmanship, product choice, and the maintenance risk left behind.
Planning Your Exterior Repaint Budget and Timeline
Exterior painting quotes vary because the work behind the colour varies. A straightforward, accessible wall in sound condition needs a different process from a multi-level coastal home with chalking, failed sealants, timber repairs, restricted access, and several substrates.
The main cost drivers are:
- Surface condition: Peeling coatings, rot, cracks, mould, and failed joints add preparation and repair time.
- Access complexity: Heights, steep sections, scaffolding, difficult rooflines, and landscaping affect safe access.
- Coat requirements: Colour changes, porosity, stain blocking, and coverage can alter the specified primer and topcoat sequence.
- Product selection: Premium acrylics, specialist primers, low-emissions options, stains, and masonry systems have different material requirements.
- Protection and clean-up: Masking, drop sheets, overspray control, and site protection should be included in the scope.
A useful estimate separates washing and treatment, preparation, repairs, priming, topcoating, access, and exclusions. That makes quotes comparable and helps you see whether a lower price reflects efficiency or omitted work. The cheapest proposal often becomes expensive when the owner later pays for peeling paint, patch repairs, or an early return to the same elevation.
Schedule the repaint before widespread failure. Early maintenance can preserve sound coating and reduce the amount of scraping and substrate repair required. Timing also needs to allow for dry surfaces and suitable application conditions, so a contractor should explain how they'll manage rain and humidity rather than promise an unrealistic fixed finish date.
A local contractor should provide an on-site assessment, written scope, insurance details, and a workmanship guarantee. Ask whether the crew understands the differences between weatherboard, plaster, brick, and cedar, and whether the estimate identifies the actual primer and topcoat system. Painters North Shore provides exterior painting for these substrates, with preparation, weather-appropriate coatings, colour consultation, and itemised estimates included within its service approach.
The practical next step is to inspect each elevation, photograph visible defects, and request two or more detailed assessments. Compare the preparation plan and system specification before comparing the final price.
Painters North Shore can assess your North Shore property, match primers and exterior topcoats to its substrate and exposure zone, and provide a detailed itemised estimate. Visit Painters North Shore to arrange an exterior repaint consultation and plan the work around Auckland's weather conditions.