A fence with open gaps can look like an easy spray job until the first gust carries paint onto the neighbour's wall, plants, or windows. The spray reaches the front faces quickly, but it can also pass straight through the openings, leaving thin edges and an uneven finish on the rails and the back of the palings.
That's why how to spray paint a fence with gaps is not just a matter of pointing the gun and pulling the trigger. On Auckland's North Shore, the reliable method combines thorough preparation, careful masking, controlled spray passes, and immediate back-brushing where the mist can't reach properly.
Why Gap Fences Require Different Prep
A solid wall gives overspray nowhere to go except onto the surface in front of you. A gapped fence is different. Wind moves through the openings, salt-laden moisture reaches more timber, and paint can travel beyond the fence before it has a chance to form an even film.
That combination makes open fencing less forgiving than a solid boundary. A spray coat may look acceptable from the garden side while leaving the inner edges, rails, and shadowed faces lightly covered. The finish can also vary from paling to paling if rough timber absorbs the coating at different rates.
Coastal exposure changes the job
North Shore fences deal with damp weather, coastal salt, mildew, and strong sunlight. Those conditions make preparation more important because paint needs a clean, stable surface to bond with. Scrubbing away dirt, removing loose coatings, and priming bare timber aren't optional cosmetic steps. They determine whether the new coating stays attached.
Local fence-painting guidance treats spraying as a preparation-heavy job, not a shortcut. The recommended sequence is to clean the surface, remove failing paint, and prime exposed timber before applying the finish coat. That approach is particularly relevant when you're planning setting up a garden fence, because the construction and condition of the timber will affect how easily you can maintain it later.
Site rule: If the timber is dirty, damp, chalky, or loose under the old coating, spraying over it only hides the problem temporarily.
New timber needs particular care. Local guidance recommends waiting until treated timber has weathered and dried, with solvent smells gone, before painting. Residual moisture or treatment solvents can interfere with adhesion, so a newly installed fence shouldn't automatically be coated as soon as construction finishes.
Open gaps expose weak preparation
Cracks, holes, loose boards, and open end grain create points where water can settle. Spraying won't stabilise those areas. Repair the defects first, then use the detailed preparation methods described by Painters North Shore's fence-painting team as a useful local benchmark for preparation-led work.
The practical difference is simple. A solid wall may hide a missed edge until the finish begins to fail. A gapped fence displays missed edges immediately, especially when viewed from an angle or in low afternoon light.
Surface Preparation and Masking Strategy
Preparation should be organised before the spray gun comes out. The aim is to create a dry, sound surface and prevent paint from travelling through the fence openings onto anything you don't own.
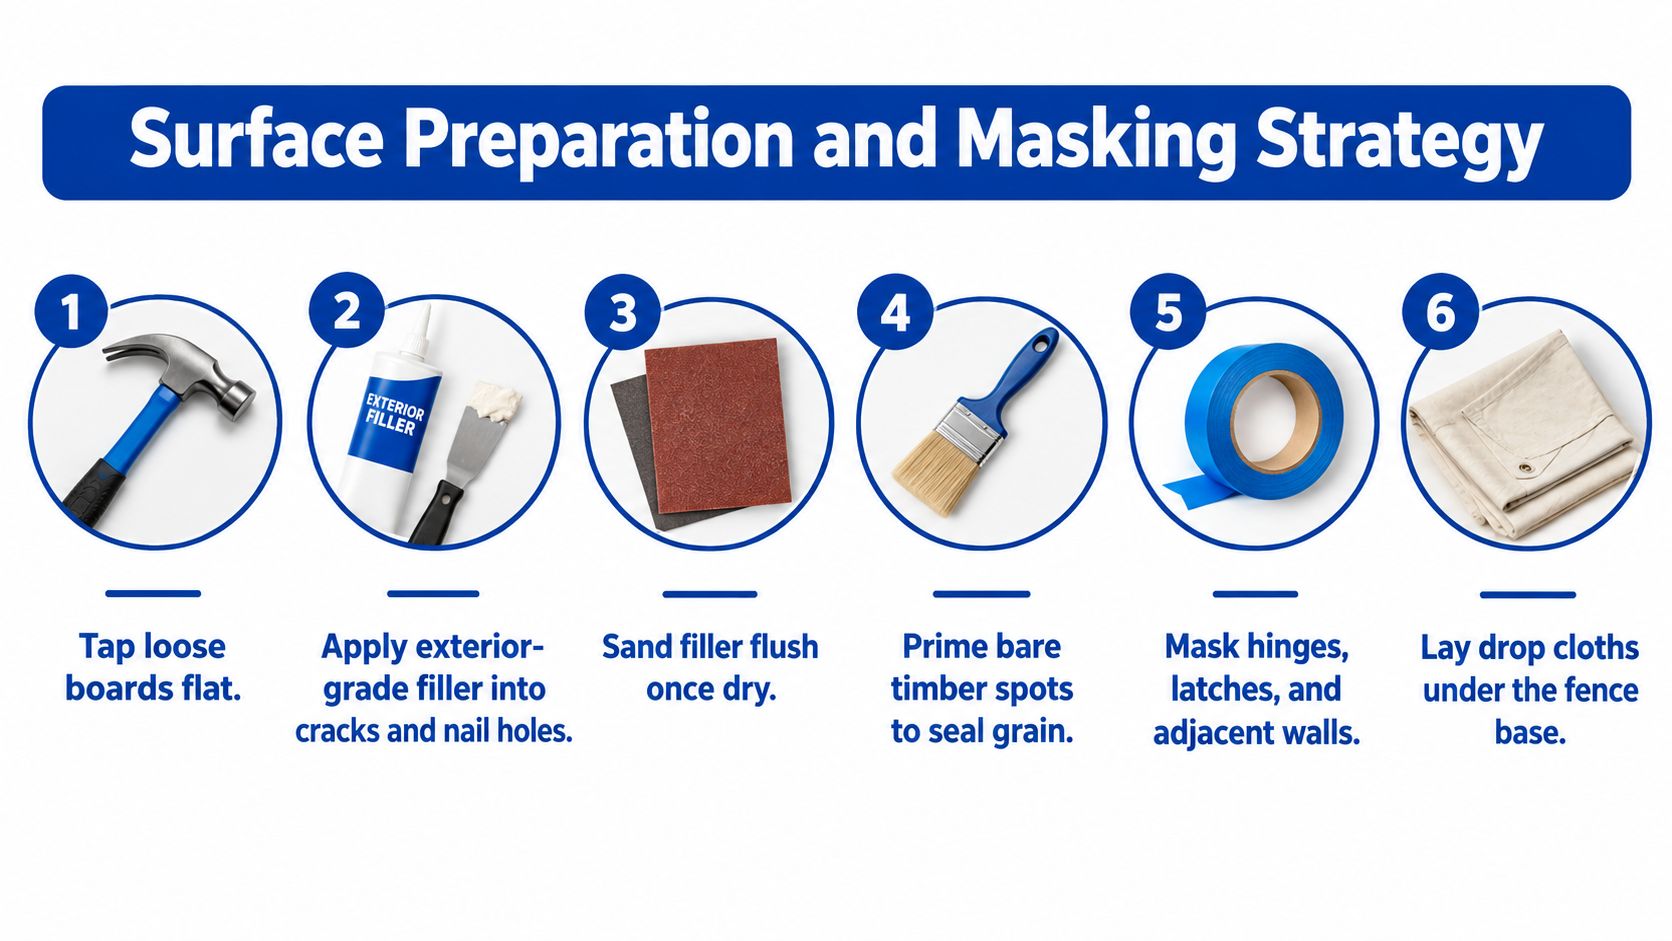
Prepare the timber in order
Check the structure first. Tap loose boards back into position and replace timber that is rotten, badly split, or unstable. Paint won't correct movement or decay.
Wash the fence thoroughly. Remove dirt, mildew, salt residue, cobwebs, and flaking material. Allow the timber to dry fully before continuing. Damp wood can prevent the coating from bonding properly.
Fill defects. Use an exterior-grade filler for suitable cracks, holes, and gaps that need stabilising. Don't use filler as a substitute for replacing timber that has lost its strength.
Sand the repairs flush. Once the filler has dried, sand it until the repaired areas sit as evenly as possible with the surrounding timber. Raised filler edges will remain visible after spraying.
Prime bare timber. Spot-prime exposed wood, cut ends, and areas where sanding has removed the old coating. Primer helps seal the grain and creates a more consistent base for the topcoat.
Remove dust before masking. A clean brush or vacuum helps prevent loose sanding dust from becoming trapped in the finish.
This sequence follows NZ exterior-painting guidance, which recommends filling cracks, holes, and gaps, sanding repairs flush, and applying at least two coats to prepared surfaces. The same principle applies to gapped fencing, even though the spray can reach the visible faces quickly.
Mask both sides of the fence
Masking needs to account for the spaces, not just the boards. Place cardboard, builder's paper, or plywood behind the fence wherever paint could pass through. Secure the protection so wind can't lift it into the wet coating.
Protect neighbouring walls, paving, garden beds, outdoor furniture, gates, hinges, latches, and nearby windows. Drop cloths should sit under the fence base, but don't rely on them to catch all overspray. A gap fence can send paint sideways and backwards, so physical shielding behind the work is more dependable than covering only the ground.
Practical check: Stand on the opposite side of the fence and look through the gaps before spraying. Every visible item behind those openings is a potential overspray target.
Choosing Between Spray-Only and Back-Brushing
Spray-only is fast on broad, open faces, but speed doesn't guarantee film build in the difficult places. Fine atomised paint can skim across rough-sawn timber and leave the inner faces of palings, rails, corners, and narrow shadows under-protected.
A spray-plus-brush method takes more hands-on work, yet it gives the coating somewhere to go. The spray lays material across the broad surfaces, while a brush pushes it into grain, edges, gaps, and recesses before the coat starts to skin over.
Compare the two methods
| Method | Where it works | Main limitation |
|---|---|---|
| Spray-only | Large, accessible faces on a sound, relatively even fence | Can miss inner paling faces, edges, and tight corners |
| Spray with back-brushing | Rough-sawn, porous, detailed, or visibly gapped timber | Requires immediate follow-up while the coating remains workable |
| Brush-only | Small areas, detailed sections, and situations where overspray cannot be controlled | Slower across long runs and can leave visible brush variation |
A rough-sawn paling fence usually benefits from the combined method because the timber profile creates small hollows that a fine mist won't reliably fill. Tight corners may need a denser spray stream or direct brush access. The trade guidance from Painters North Shore also reflects this practical distinction, using spray application for coverage and back-brushing or back-rolling for detailed surfaces.
Match the method to the fence
Use spray-only only when the fence is stable, clean, relatively uniform, and easy to access from the correct angles. Even then, inspect the gaps and shadowed areas after the first coat rather than assuming the mist has reached everything.
Choose back-brushing when:
- The timber is rough-sawn: Brush pressure works coating into the uneven grain.
- The gaps are narrow or irregular: A brush can reach areas the spray pattern misses.
- The fence has deep rails or recessed edges: Direct contact improves coverage.
- Durability matters more than speed: The extra labour reduces thin, exposed edges.
Back-brushing doesn't mean scrubbing the paint dry. Work in manageable sections, spray enough material to wet the surface, then brush immediately with the grain. If the coating has started to set, aggressive brushing can disturb the film and create visible texture.
Spraying Techniques for Controlled Coverage
Good spraying is controlled and deliberate. Keep the gun moving before pulling the trigger, hold it square to the surface for the main pass, and release the trigger before stopping at the end of a stroke. That prevents heavy spots at the edges of each movement.
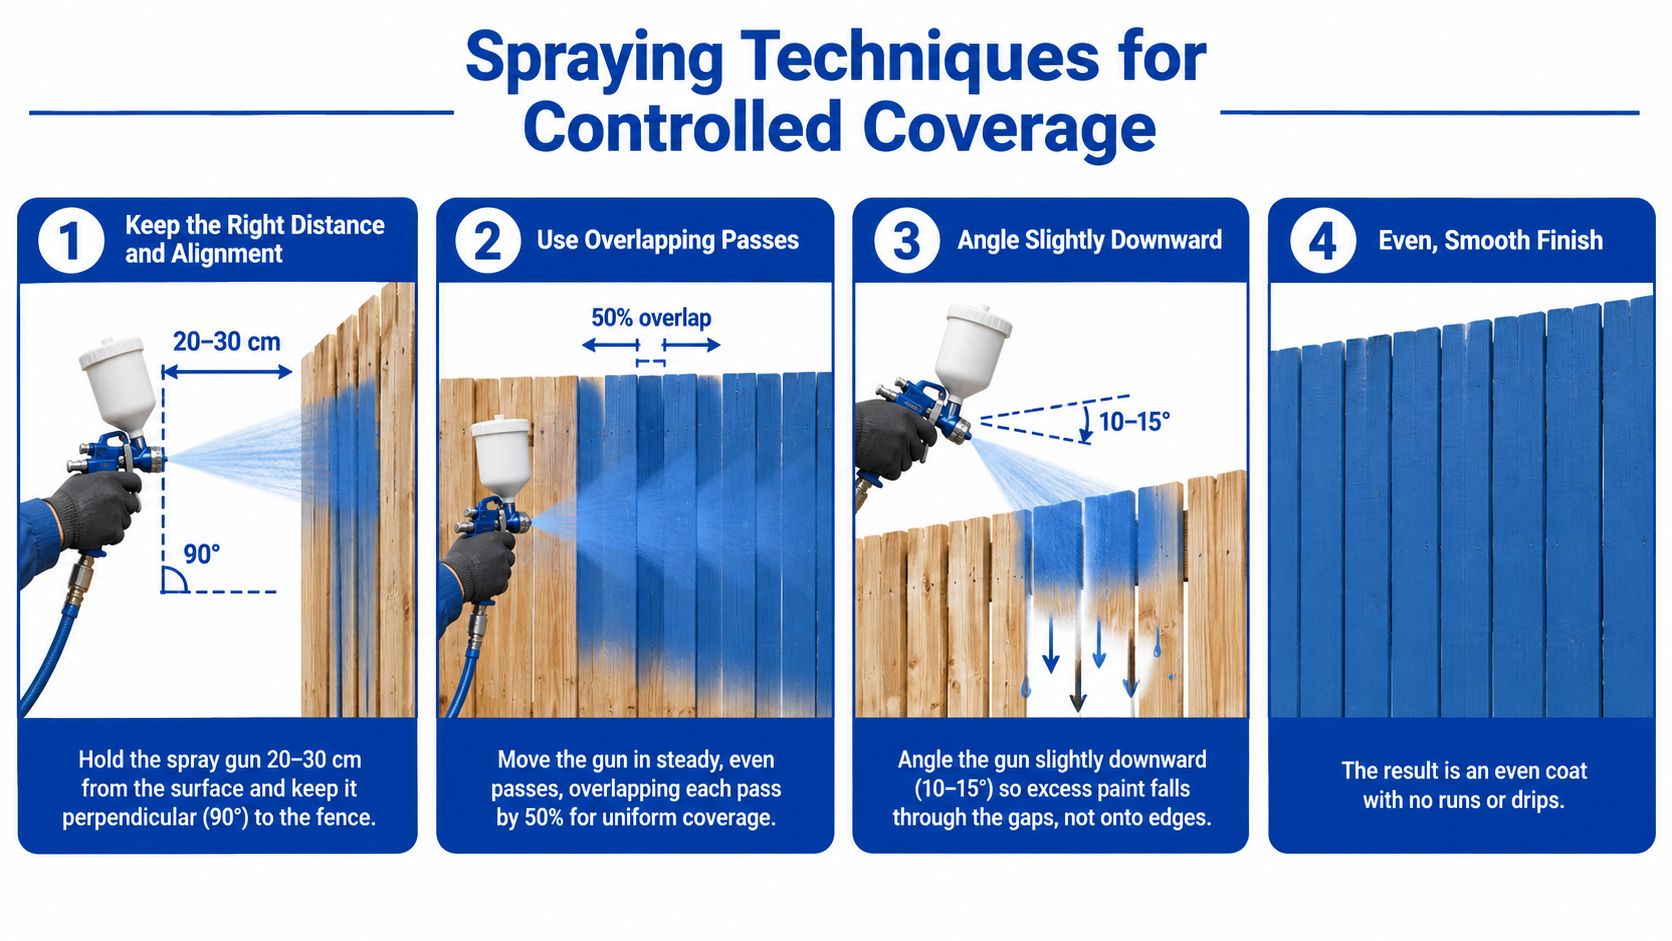
Control distance and overlap
Hold the spray gun around 20–30 cm from the timber, as recommended in NZ fence-painting guidance from Resene. Too close and the coating can sag or build up on edges. Too far away and the material can dry in the air, increasing overspray and leaving a dry, patchy surface.
Overlap each pass by approximately 50%. This reduces striping and helps maintain a consistent film across broad boards. Move at a steady pace rather than slowing down whenever you reach a gap, because hesitation deposits excess paint at the opening.
Work in sections that you can spray and back-brush while the coating is still open. On rough timber, the spray should provide wet coverage, not a dry dusting. The brush then works the product across edges and into the grain.
See how controlled spray application differs on detailed surfaces before choosing equipment or technique for a fence with unusually tight details.
Use the gaps to guide your angle
For the first coat, keep the gun aligned with the main fence face. Once that coat has dried, change the spray angle for the second coat. An altered angle helps the coating reach areas hidden behind rails and board edges during the first pass.
Don't try to flood the openings. Excess paint can sag into gaps, collect along the bottom edges of palings, or pass through onto the neighbour's side. If a tight corner remains thin, use a denser stream briefly or reach it with a brush instead of compensating by spraying the whole fence heavily.
Keep checking the surface from several viewing angles. A fence can look evenly covered head-on while revealing missed edges when the light hits across the boards. Inspect each section before moving the masking, because a small repair while the setup is still in place is easier than returning after the equipment has been cleaned.
Weather Windows and Drying Times
A technically correct spray pattern can still fail if the weather works against it. Wind carries coating through the gaps and makes masking less reliable. Direct hot sun can dry the surface too quickly, while damp timber and humid air slow drying and increase the chance of poor adhesion.
NZ product guidance recommends avoiding wind, hot direct sun, and damp or wet timber. For many exterior systems, allow roughly 2 hours between coats under normal conditions, with more time needed in cooler or humid weather, as described in British Paints' fence-painting guidance.
Plan around Auckland conditions
A North Shore fence may receive sun on one side and remain shaded on the other. Don't judge readiness from the exposed face alone. Check the shaded boards, rails, and areas around the gaps, where moisture can remain for longer.
Wind deserves special attention because an open fence acts like a series of spray windows. Even a moderate breeze can carry wet material onto neighbouring property. If cardboard or plywood is moving, the conditions aren't controlled enough for a clean spray finish.
Humidity also affects the schedule. Local NZ painting guidance repeatedly favours exterior weather windows below about 85% humidity, particularly where drying and adhesion are concerns, as outlined in this North Shore exterior-painting guidance.
Avoid rushed recoating
Recoating while the first layer is still too wet can cause sagging into the openings and heavy build-up along edges. Waiting longer than the minimum is sensible when the air is cool, the timber is shaded, or the surface feels soft under a light touch.
Organise the job so the fence can remain masked until the coating has dried adequately. If the forecast changes, stop rather than trying to finish one more section in rising wind or approaching damp weather. A controlled pause is cheaper than cleaning overspray from the neighbour's property or repairing a sagging, uneven coat.
Equipment, Safety, and Coating Selection
Use equipment that gives you control rather than maximum output. A suitable spray gun, clean filters, extension leads rated for outdoor use, masking tape, plywood or cardboard shields, drop cloths, an exterior brush, and clean-up materials form the practical kit.
Wear eye protection, gloves, suitable respiratory protection, and clothing that covers exposed skin. Keep people, pets, and neighbouring property away from the spray zone, and follow the coating manufacturer's instructions for ventilation and personal protective equipment.
For coastal timber, choose a compatible exterior system with UV resistance and a finish suited to the fence profile. Low-VOC options are available where specified, but the product still needs to be suitable for exterior timber and applied over the correct primer. The preparation and coating guidance on exterior paint for wood can help you compare systems before buying.
Your final checklist is straightforward:
- Prepare: Clean, repair, sand, and prime.
- Shield: Mask both sides and protect the ground.
- Spray: Maintain distance, overlap passes, and avoid flooding gaps.
- Brush: Work coating into rough grain, edges, and shadows.
- Dry: Respect the weather and recoat window.
- Inspect: Check both sides and all openings before dismantling the setup.
Painters North Shore provides preparation-led fence spraying with masking, spray application, and back-brushing for rough-sawn and gapped timber. Visit Painters North Shore to arrange an assessment of your fence, discuss suitable exterior coatings, and plan the work around North Shore weather conditions.