You've painted the lounge a clean new colour, moved the furniture back, and felt that satisfying sense of a job finished. Then a small bubble appears beside the window. A dark mark returns in the corner behind the wardrobe. The new surface looks patchy where filler was applied, or starts peeling near a damp hallway wall.
That isn't always a paint problem. In North Shore homes, interior wall painting can expose decisions that were missed earlier, including moisture, unstable coatings, poor repairs, unsuitable products, and hazardous older paint layers. A durable result starts with deciding whether the wall needs a cosmetic refresh or proper maintenance before any new colour goes on.
Why Interior Wall Painting Fails Before It Begins
A recent repaint can fail quickly when the wall was treated as a blank canvas instead of part of the building. One common example is a bedroom wall beside an older aluminium window. The room looks dry on the day of painting, so the owner washes the wall, rolls on a standard waterborne finish and closes the windows. Later, condensation returns around the reveal, the coating loses adhesion and mould appears at the coldest section.
The paint didn't cause the moisture. It only covered a symptom without solving the condition underneath. Auckland's humid coastal air, shaded rooms, salt exposure around open windows and older construction can all make a rushed preparation job more obvious.
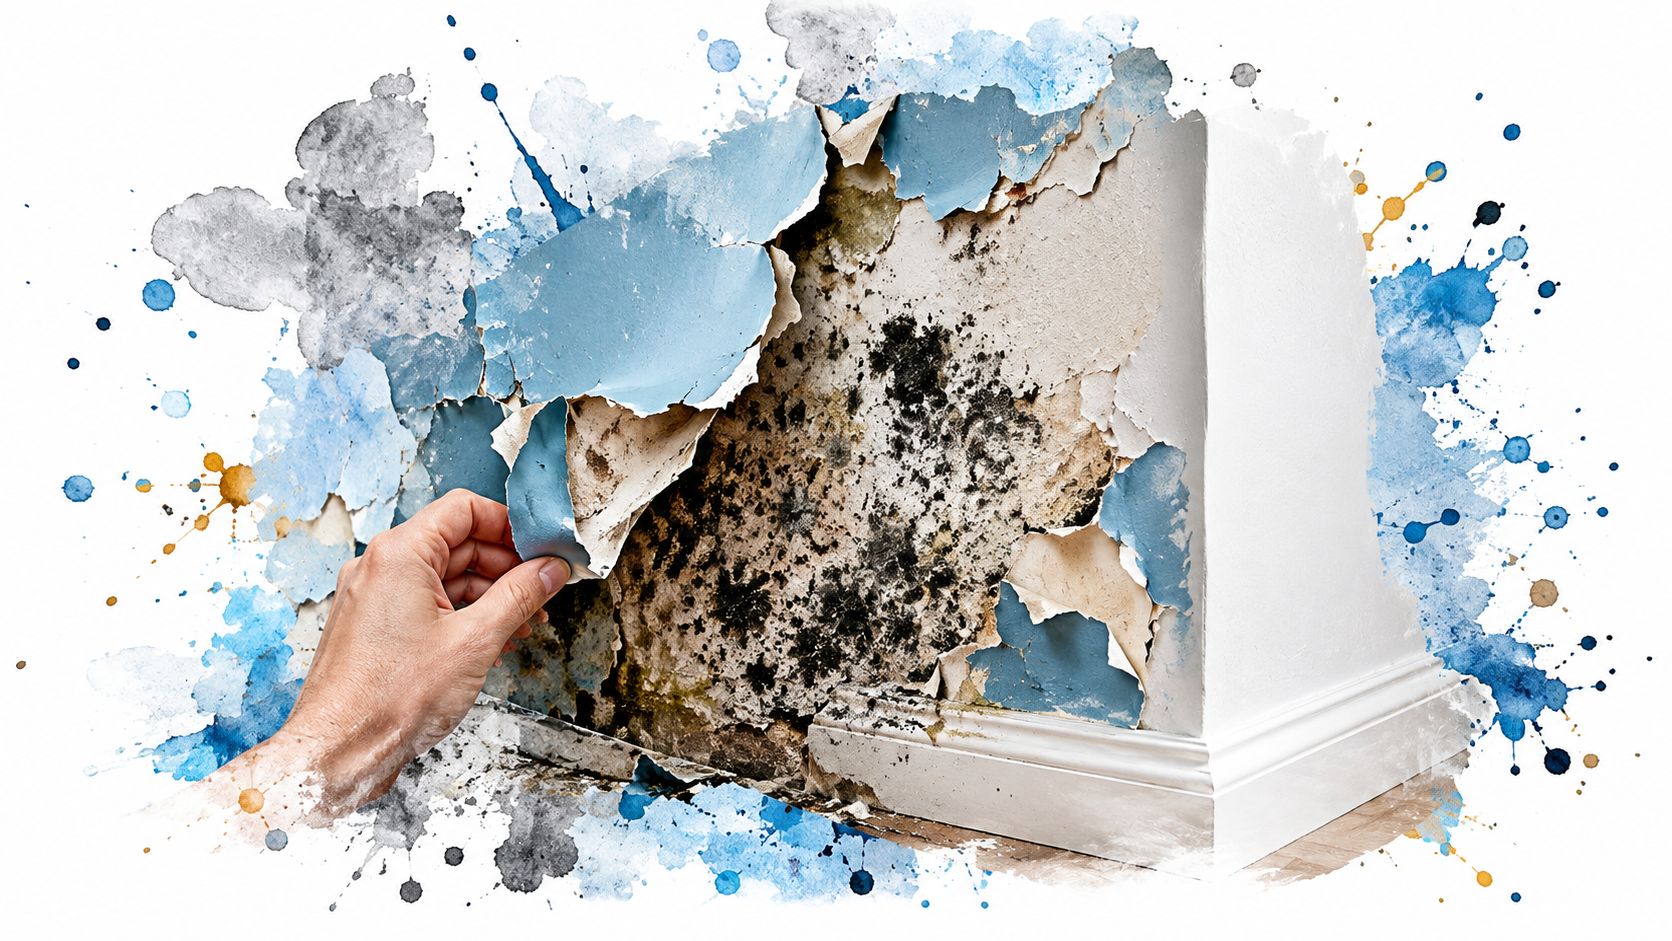
Start with diagnosis
Before choosing a colour, run your hand over the wall and inspect it from the side. Look for:
- Moisture clues: Bubbling, tide marks, mould, soft plaster or recurring staining near windows and exterior walls.
- Movement: Cracks that follow plasterboard joints, corners or changes in substrate.
- Coating failure: Flaking, chalking, cracking or glossy enamel that could prevent the new coat bonding.
- Old coverings: Wallpaper, hessian-backed finishes and layers of unknown paint that may conceal uneven or damaged surfaces.
New Zealand homes changed substantially during the early twentieth century. Te Ara records that Victorian and Edwardian rooms often used wallpaper over hessian scrim, while by the 1930s flat lining boards such as plasterboard and fibrous plaster were used almost universally in living rooms, dining rooms, bedrooms and hallways (Te Ara's history of home décor and furnishings). That history matters when an older North Shore villa has several generations of repairs beneath its current finish.
Practical rule: If the same stain, crack or mould mark returns after cleaning, investigate the cause before repainting. A new colour can hide a problem briefly, but it can't repair it.
A written scope from a local contractor should identify repairs, primers, finish coats and exclusions rather than naming a colour alone. This guide to choosing reliable painting contractors in Auckland is useful when comparing quotes, particularly for older villas, apartments and homes close to the coast.
Preparation Is Not Just Washing
Preparation begins with identifying what the wall is made of and how stable the existing coating is. Washing is important, but it's only the first control. Paint applied over dust, grease, loose film or unsealed filler can develop fisheyes, flashing, poor adhesion and visible patchiness.
A preparation sequence that works
Clean the surface. Use warm water with a mild detergent or a dedicated interior paintwork cleaner. Remove dust, cooking residue, hand marks and any surface contamination, then allow the wall to dry fully.
Test the existing coating. Don't sand every wall automatically. Resene's New Zealand guidance says routine full-wall sanding is usually unnecessary unless the surface has imperfections, flaking paint or old enamel (Resene paint systems guidance). Scrape loose edges, dull glossy areas where required, and feather the transition so the repair doesn't telegraph through the finish.
Repair the surface. Fill dents, nail holes and scraper cuts with a suitable interior filler. Once dry, sand the edges rather than grinding a hollow into the surrounding plasterboard. Inspect under raking light, because ordinary room lighting can conceal ridges.
Seal problem areas. Porous plasterboard, gypsum stopping, fibre cement, stains and marker bleed need the specified sealer or primer. Resene Waterborne Sureseal, for example, requires a clean, dry, dust-free surface and careful drying conditions before topcoating, as set out in the manufacturer's guidance.
Control dust. Vacuum sanding residue instead of redistributing it across the room. Wipe down where appropriate, then allow the surface to dry before masking and coating.
The hidden cost of slow prep is often more than lost time. Incomplete preparation can mean another visit, another round of sanding and another attempt to match the repaired area.
Treat older paint cautiously
Lead is a serious consideration in older New Zealand housing. Te Ara reports that lead was used in interior and exterior paints during the late nineteenth and early twentieth centuries, titanium dioxide progressively replaced white lead from 1945, some lead pigments remained common until the mid-1960s, and white lead wasn't banned in New Zealand until 1979 (Te Ara's history of building trades).
That doesn't mean every old wall contains lead, but it does mean pre-1979 homes deserve caution. Avoid dry sanding or aggressive scraping of uncertain layers. Use dust control, containment, suitable protective equipment and appropriate waste handling, and obtain specialist advice where the coating history is unclear. For a practical wall sequence, see this guide to how to prep walls for painting.
Choosing the Right Paint for Your Home
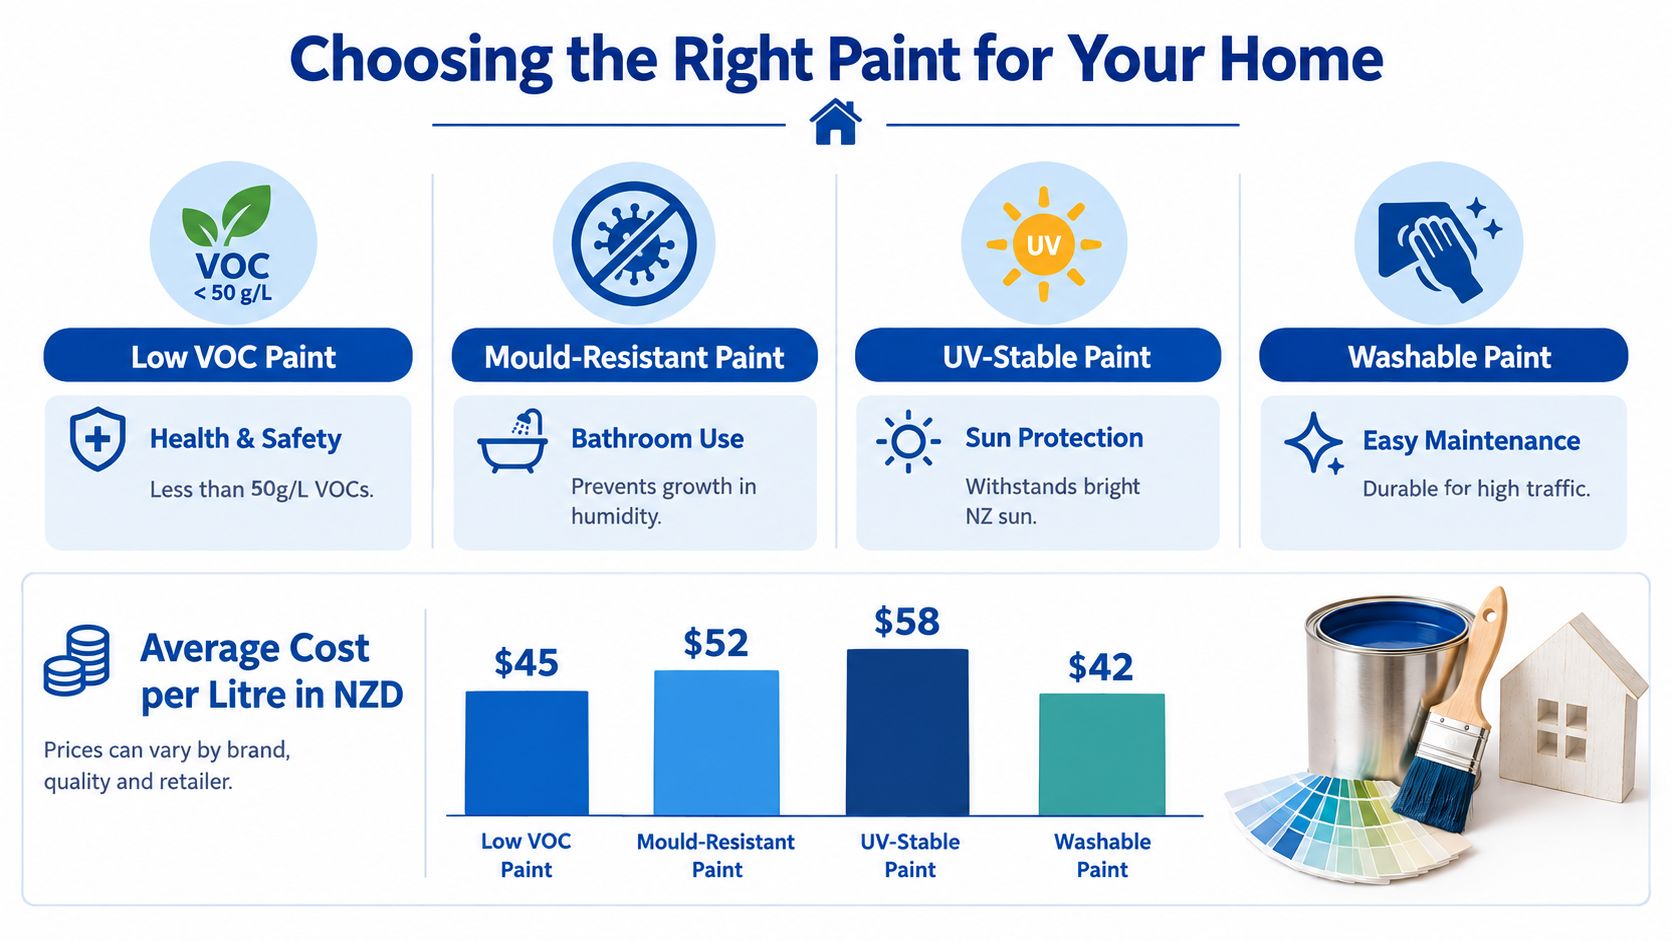
Paint selection should follow the room, substrate and maintenance demand, not a single default product for the whole house. A quiet bedroom, a busy hallway and a steamy laundry place different demands on the coating. In North Shore homes, humidity and strong daylight also make ventilation, drying and colour stability part of the decision.
Match sheen to the wall
Low-sheen and matt finishes soften reflected light and disguise minor surface variation. They suit bedrooms and living rooms, but a very flat surface can be less forgiving when occupants need to wipe marks repeatedly.
Low-sheen washable finishes offer a useful compromise in family areas and hallways. They provide a restrained appearance while giving you more practical cleaning ability than a dead-flat finish.
Higher-sheen coatings are easier to wipe and can suit trims or selected high-wear areas. They also reflect more light, so every ridge, patch and sanding mark becomes easier to see. That's why a glossy finish rarely rescues poor preparation.
For a room-by-room explanation of reflectivity, patch visibility and cleaning, use this guide to matte versus gloss paint. In bathrooms, kitchens and laundries, choose a system specifically rated for wet areas rather than assuming a standard interior low-sheen product will cope.
Read the technical sheet
A useful NZ benchmark is two full coats of a suitable interior waterborne finish, applied when conditions remain at or above 10°C. Resene Crown Interior Low Sheen lists a typical spreading rate of 16 m²/L per coat, a 25-micron dry film thickness at that rate, a minimum drying time of 45 minutes and a minimum recoat time of 2 hours at 20°C (Resene Crown Interior Low Sheen technical sheet). Those are theoretical benchmarks, not guarantees for a rough, patched or porous wall.
Low-VOC paint can be a sensible choice, especially in bedrooms and children's rooms, but low odour doesn't mean zero emissions. MBIE advises checking the label or safety data sheet, maintaining ventilation during and after renovation, and taking particular care with vulnerable occupants (MBIE guidance on unhealthy air and renovation). It advises avoiding newly renovated rooms, especially babies' rooms, for one to two months where practical.
Some homeowners compare paint with decorative alternatives such as vinyl finishes. The practical differences in repairability, texture and installation are outlined in this comparison of vinyl wrap versus paint. For most interior walls, though, the decisive choice remains the right substrate preparation and coating system.
Applying Paint Like a Pro
Good application is controlled rather than hurried. Start by protecting floors, fittings and adjacent surfaces, then organise brushes, roller sleeves, a sturdy tray, extension pole, filler knife, clean rags and suitable masking materials. A quality tool won't correct an unprepared wall, but poor tools can introduce lint, uneven loading and rough texture.

Build an even film
Cut in one manageable wall at a time rather than outlining the entire room and allowing the edges to dry. Load the roller evenly, apply in overlapping sections, then finish with light, consistent passes in the same direction. Keep a wet edge so the next section blends into the previous one instead of creating lap marks.
Don't keep rolling an area after the film has started to set. That pulls at the coating, creates drag and can leave a visible change in sheen. Check the first coat from several angles before deciding whether the second coat needs extra attention around repairs or strong colour changes.
Application rule: Thin, inconsistent coats often look acceptable while wet. Judge coverage after drying, then apply the specified second coat rather than trying to force hiding with one heavy pass.
Temperature, humidity and airflow affect drying. North Shore homes can remain cool and damp even when the day feels comfortable outside. Ventilate without creating a strong cross-draught that skins the surface too quickly, and use controlled heating or air movement rather than blasting warm air directly at the wall.
A small adhesion and colour test is worthwhile, especially over repaired areas or an existing dark colour. Keep records of the product batch, colour, substrate repairs, coverage and recoat timing so future touch-ups have a reliable reference.
The same care applies around windows and removable screens. If screens are dirty or weathered, cleaning or reviving your window screens can improve the finished result around freshly painted reveals.
DIY or Hiring a Local Expert
A small, dry room with sound walls can suit a capable DIY painter. A clean plasterboard bedroom with a few nail holes is manageable if you can control dust, ventilation and drying time. The decision comes before the first roller is loaded: is the wall ready for paint, or is the coating hiding a maintenance problem?
| Situation | DIY may suit | Bring in a specialist |
|---|---|---|
| Surface condition | Stable walls with small repairs | Flaking, bubbling, mould or extensive patching |
| Home age | Known modern coating history | Older villa or uncertain paint layers |
| Room type | Bedroom or lounge with manageable access | Stairwell, high ceiling, occupied commercial space or multi-unit property |
| Time available | You can clean, repair, sand and wait between coats | You need staged work with predictable completion |
| Finish expectation | You accept minor variation | You need consistent sheen across connected rooms |
The calculation changes when preparation becomes the main job. Peeling paint, recurring mould, widespread cracking, water stains, several old coatings and difficult access can turn a weekend refresh into a repair project. Auckland's damp conditions, salt air and older villas make that distinction more important. Painting over movement, moisture or failed adhesion only hides the fault temporarily.
A specialist assessment makes sense when the wall may need maintenance before decoration. A BRANZ-based analysis found that 85% of owned dwellings and 96% of rented dwellings required at least some interior maintenance at the time of its survey. Estimated outstanding maintenance across interior and exterior components was about NZ$20.65 billion (BRANZ-based undone maintenance analysis). The figures support a practical triage: establish the wall's condition first, then decide whether painting is the complete job.
Ask each contractor to identify defects, state the preparation allowance, specify primer requirements, list the number of coats and explain any finish limitations. Painters North Shore is one local option offering preparation-led interior painting and low-VOC systems for residential rooms. Compare the written scope, not just the quoted price.
Maintaining Your Painted Walls
A wall can look ready for a touch-up while moisture, condensation or failing adhesion continues underneath. On North Shore homes, damp weather, salt air and older wall linings make a quick inspection part of responsible interior wall painting. Light cleaning and small repairs maintain a sound finish. Stains, mould and bubbling need a different response.
Use a simple inspection cycle
- Clean gently: Use a soft cloth or sponge, clean water and mild detergent. Test first in an inconspicuous place, especially on matt paint.
- Check damp zones: Inspect window reveals, wardrobes against exterior walls, corners behind furniture and rooms with limited airflow.
- Track changes: Spreading stains, soft patches, bubbling film or recurring mould require investigation, not repeated touch-ups.
- Repair early: Fill isolated nail holes and deal with small scuffs before damage extends across the wall.
- Ventilate sensibly: Air rooms when conditions allow. Keep furniture slightly away from cold exterior walls where condensation is likely.
A paint defect can signal a wider maintenance problem. BRANZ findings indicate that deferred maintenance is common, often because repair costs compete with other household spending (BRANZ-based maintenance analysis). Budget for the underlying repair before recoating if a stain returns, mould reappears or the surface feels soft. Painting over moisture or movement usually delays the visible problem rather than fixing it.
Keep a record
Record the room colour, product, sheen, batch and application date. Store a labelled sample or a small amount of leftover paint where possible. An older tin may not match perfectly after the wall has aged, so test the colour in daylight. For a touch-up, clean the area, feather the edges and check the result from several angles before repainting the entire wall.
Interior paint lasts longer when it finishes a maintenance job rather than concealing one. For North Shore properties, inspect moisture, respect older substrates, select products for the room and keep ventilation in place from preparation through reoccupation.
Painters North Shore provides preparation-led interior painting for North Shore homes, including wall repairs, colour guidance and low-VOC coating options. If staining, peeling or mould is present, visit Painters North Shore to arrange an assessment before committing to a cosmetic repaint.