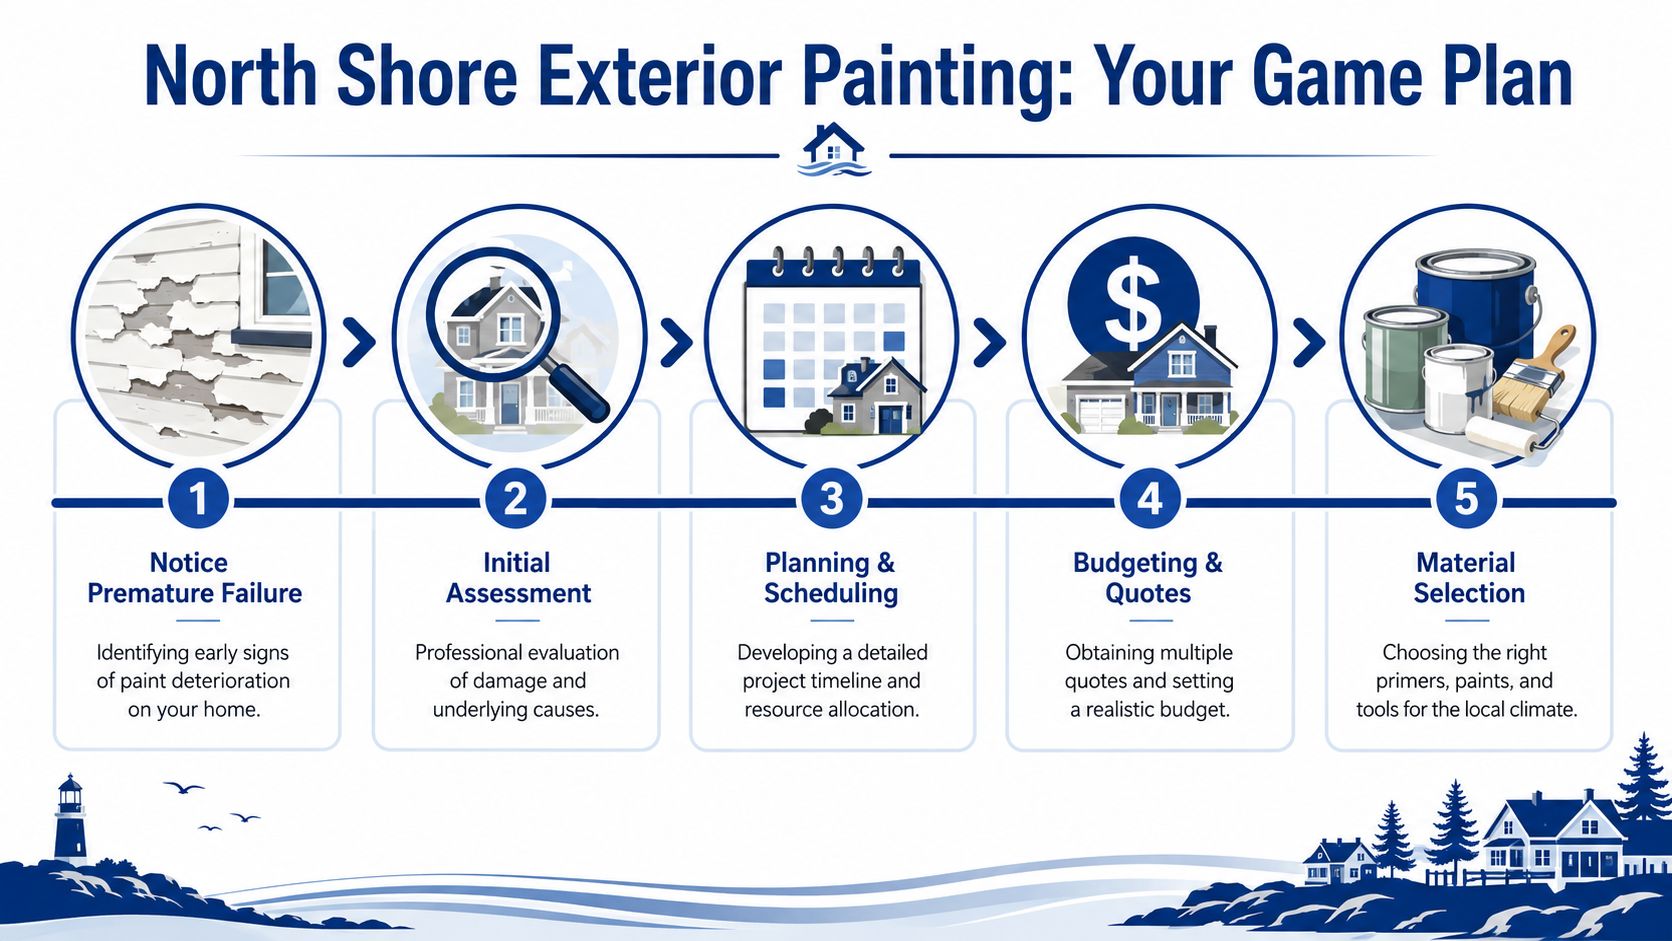
You've probably seen the signs already. The sunny side of the house looks faded, the weatherboards near the coast feel chalky when you rub them, and that small bubble by the window head has turned into a strip of peeling paint. On the North Shore, that's rarely “just age”. It's usually a mix of salt, damp mornings, hard UV, and prep that failed years earlier.
Painting outside of a house here isn't the same job it is inland. A Milford villa, a Takapuna plaster home, and a cedar place in Browns Bay can all sit within a short drive of each other and still weather very differently. That's why generic painting advice often lets homeowners down. The surface matters. The exposure matters. The season matters. And above all, the preparation matters.
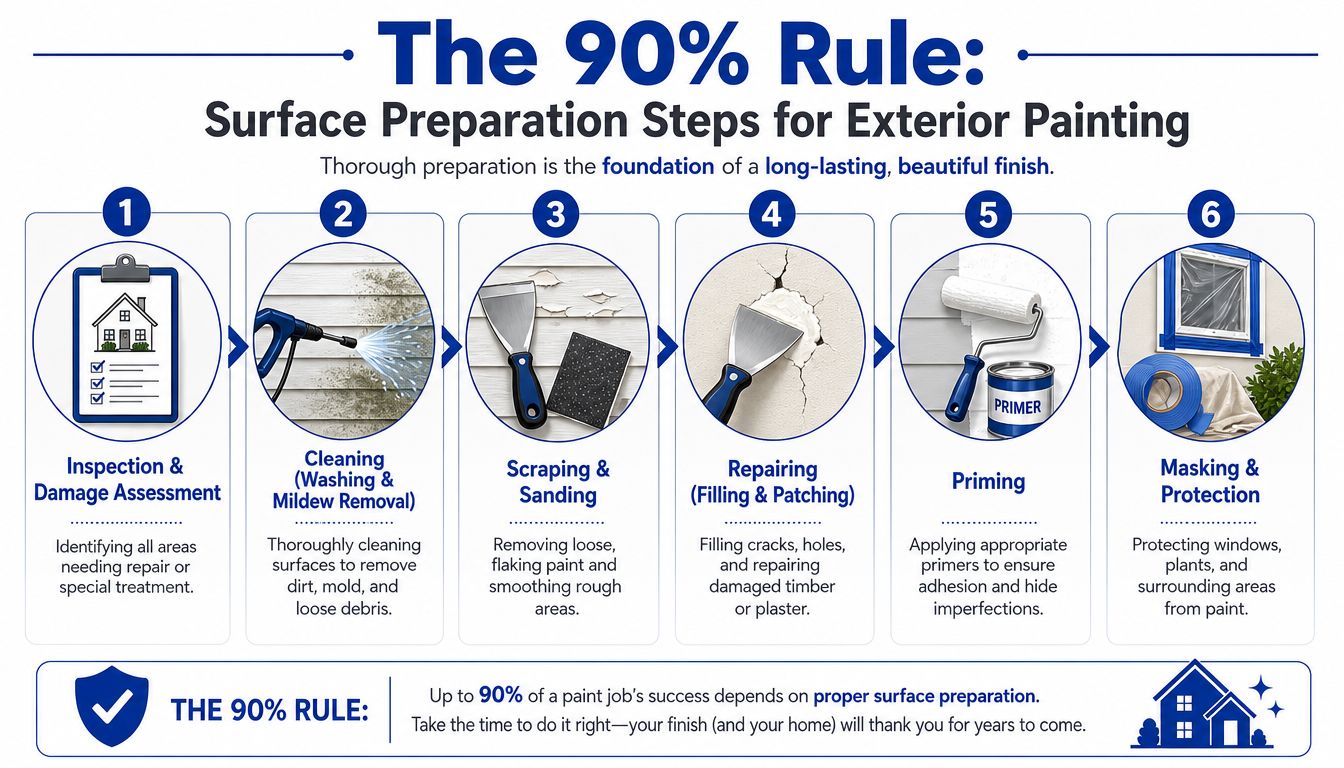
I'll say it plainly because it's the truth on almost every exterior repaint. Preparation is 90% of the job. The final coats get the attention, but the wash, scrape, sand, fill, prime, and timing decisions are what decide whether the finish holds or starts failing early.
Your Pre-Painting Game Plan on the North Shore
A Castor Bay weatherboard can look fine from the driveway and still be failing on the sea-facing wall. I see that often. The front elevation holds colour, the sheltered side seems serviceable, then the salt-loaded corner by a soffit line is chalking, the window heads are lifting, and the south side stays damp well into the afternoon. That is how North Shore repaints catch people out.
The first planning mistake is treating the whole house as if it weathers evenly. It does not. A home above Milford beach cops a different level of salt than a place tucked back in Glenfield. A cedar house in Browns Bay moves differently from fibre-cement weatherboard in Birkenhead. Plaster in Takapuna can hide hairline cracking until moisture gets behind the film. On this coast, shortcuts in prep fail early because salt sits on the surface, damp slows curing, and weak edges around joints and repairs are the first places the system lets go.
Preparation is still 90% of the job, and the reason is simple. Paint only sticks as well as the surface under it. If that surface is dirty, chalky, damp, sun-brittle, or already losing adhesion, the new coat inherits the same weakness. A tidy topcoat can hide that for a season. It does not fix it.
What to check before you touch a brush
Start with a slow lap of the house at arm's length. Check each elevation on its own merits, especially the seaward side, the south-facing side, and anywhere shaded by trees or neighbouring houses.
Look for these signs:
- Chalking: Rub the surface with your palm. A dusty residue means the old coating has broken down and needs proper washing and, in some cases, stabilising.
- Cracking: Fine film cracks often show age and loss of flexibility. On timber, they can also point to movement that a simple recoat will not hide for long.
- Peeling: Lifting edges around weatherboard laps, trims, and window heads usually mean moisture entry, poor prep, or failed spot repairs from the last job.
- Blistering: Bubbles usually tell you moisture or contamination is trapped under the coating.
- Black or green growth: Mildew and algae are common on damp elevations. If they are left in place, paint goes over contamination instead of over sound substrate.
Each defect changes the job plan. Chalking calls for more than a quick rinse. Peeling means chasing every loose edge until you reach sound paint. Mildew means a proper treatment wash, not wishful thinking.
If one side of the house is failing much faster than the others, assume there is a reason. On the North Shore, it is often exposure, slow drying, or salt spray rather than simple age.
Plan around Auckland weather, not your deadline
Auckland winter catches out plenty of DIY jobs because the air temperature sounds acceptable while the cladding is still too cold or too damp. In shaded areas, that matters a lot. Painting on a substrate colder than 12°C with standard paint is a “no-go” because the paint will not cure properly and early failure can follow, according to Habitat by Resene's winter painting guidance.
That limit matters most on south-facing walls, ground-floor cladding under heavy tree cover, and homes in gullies where morning damp hangs around. I have seen houses where the sunny front was ready by late morning and the side boundary wall was still not fit to coat. If you paint both the same day without checking, one elevation can last and the other can start failing early.
Wind is another trade-off. A light breeze helps surfaces dry after washing. Too much wind pushes spray, skins paint too fast, and loads airborne salt and dust onto fresh work near the coast.
A solid planning checklist
Before any painting outside of house work starts, lock in the basics:
Identify every substrate
Do not assume the whole exterior is one material. Timber trims, plaster patches, fibre-cement sheets, block walls, and metal flashings all need different prep.Map the harsh and damp zones
Mark the seaward elevations, shaded sides, and spots under leaking gutters or overflowing valleys.Fix defects before pricing the paint
Rotten trims, failed sealant, cracked plaster, and leaks are repair items first. Paint is the finish coat, not the repair method.Choose a weather window, not just a month
Dry days, enough surface temperature, and enough time for coats to cure beat a rushed winter start every time.Budget for labour-heavy prep
The jobs that last are usually the ones with more washing, more scraping, more sanding, more priming, and more patience.
Homeowners also ask about fences, gates, and exterior metal at the same time as the house. That is sensible, but the coating choice can differ. If you are comparing finishes for boundary work, this guide on powder coating vs painting for fences is a useful reference.
Colour planning belongs in the early stage too, because darker colours can increase heat stress on some substrates and make existing defects more obvious once the sun hits them. If you are weighing that up before committing, it helps to review outside house paint colour ideas for North Shore homes.
One last call from experience. Patchy failure usually means patchy adhesion underneath. A wash and recoat can look good for a short time, but it rarely holds if some areas are still sound and others are already letting go. A proper assessment at the start costs less than repainting a repaint.
Choosing the Right Coatings and Colours
A Milford villa on the seaward side can burn through a paint system a lot faster than a sheltered house a few streets back in Birkenhead. Same city, different exposure. Salt spray, longer morning shade, and damp winter starts change what lasts and what lets go early.
Coating choice starts with the substrate, but on the North Shore I also judge the site. A north-facing weatherboard wall above Takapuna Beach gets hammered by UV and salt. A bush-shaded elevation in Glenfield stays damp longer and is more likely to grow mildew. If you use the same system on both without adjusting for those conditions, one side usually ages well and the other becomes your problem wall.
Paint works as a system. Primer, undercoat where needed, and topcoats all need to suit the surface underneath and the exposure outside. Cheap products can look fine for a season, but they tend to lose gloss, chalk sooner, and show failure faster where salt sits on the surface and moisture keeps cycling in and out of the substrate.
Match the system to the substrate
Here is where the trade-offs are real.
| Substrate | What usually works | What often fails |
|---|---|---|
| Weatherboard | Exterior primer on bare timber and repairs, then premium acrylic topcoats with enough film build | Coating over chalking, weak spot-priming, ignoring rusty nail heads |
| Plaster | Crack repair, stabilising where needed, then a quality exterior acrylic system suited to movement and porosity | Painting over hairline cracks, thin coats, trapping moisture around failed sealant |
| Brick | Careful assessment first, then a breathable system only if painting is actually appropriate | Painting dirty masonry, sealing in moisture, treating every brick house as paint-grade |
| Cedar | A clear decision between stain maintenance and a full paint system, with prep matched to the existing finish | Swapping from failed stain to paint without enough cleaning and sanding, or expecting stain to hide patchiness |
Weatherboard and plaster usually reward good acrylic systems from proven exterior ranges. The reason is practical. You want adhesion, flexibility, decent film thickness, and a finish that can handle hard sun on one elevation and damp shade on another.
Cedar catches a lot of homeowners out. A tired stained cedar wall near the coast often holds salt, grime, and uneven weathering deep in the grain. If the plan is to paint it, the prep standard has to be much higher than people expect or the finish will flash, peel on edges, or look blotchy within a short time.
Preparation still decides how long the coating lasts. On coastal jobs, shortcuts fail because salt stays on the surface, moisture lingers in laps and joints, and any weak point gets tested over and over. Good paint helps, but it cannot outwork poor prep.
Colour choice in North Shore light
Colour cards do not show what local light does to a house at 3 pm on a west-facing slope in Campbells Bay. Pale colours can look sharper and cleaner in full sun, but they may also show grime streaks under sills. Deep colours can look excellent on modern homes, yet they absorb more heat, stress fillers and old repairs, and highlight every ripple in weatherboards or plaster.
That matters even more on older North Shore homes. Dark colours on timber can increase movement. On plaster, they can make patched areas and waviness stand out once the sun rakes across the wall. Before locking anything in, review a few outside house paint colours for North Shore homes and test them on more than one elevation.
Do not test colour in one sheltered spot and call it done.
Look at it on the sunny side, the shaded side, and the street-facing side. Morning and late afternoon can read like two different colours, especially in winter when the light is flatter and the house stays damp longer.
Fences and gates need their own decision. Timber fencing can sit happily in a paint system, but metal fencing is a different conversation because finish durability, corrosion resistance, and maintenance expectations all change. If you are weighing those options, this guide to powder coating vs painting for fences is a useful comparison.
The best exterior colour is not the one that wins on a tiny swatch. It is the one that still looks right after salt has dried on the western wall, the sun has hit every repair, and the finish has had to live through a North Shore winter.
Mastering Surface Preparation for a Lasting Finish
A Milford weatherboard house can look dry from the street and still be holding moisture on the southern wall, under the sills, and around old window putty. That catches people out every winter. They wash one day, scrape the next, paint as soon as the sun appears, then wonder why the new coat starts lifting early on the shaded side.
Preparation is 90% of the job on the North Shore because our failures usually start under the paint, not on top of it. Salt spray settles on coastal faces from Takapuna through Castor Bay. Damp hangs around longer in gullies and under mature trees in suburbs like Birkenhead and Glenfield. Add Auckland's winter temperature swings, and every weak edge, damp patch, and chalky surface gets tested hard.
In coastal New Zealand conditions, properly primed and prepared exterior painted surfaces extend service life by approximately 25% compared to unprimed surfaces, and a thorough wash to remove salt is the critical first step to prevent adhesion failure, according to Painting Hands' coastal paint selection guide.
Start with contamination, not colour
Every repaint should begin with one question. What is sitting on the surface that will stop the next coat from bonding?
On North Shore exteriors, the usual list is longer than people expect. Salt, soot, traffic film, oxidised old paint, mildew, spiderweb residue, and chalking all get between the substrate and the primer. A wall can look clean and still fail a tape test once you start working on it.
For homeowners who want a useful practical overview before repainting, Pine Country's guide to a lasting finish is worth reading because it explains why cleaning changes the result before a single coat goes on.
Washing also has to be followed by proper drying time. In Auckland winters, that is not a formality. On a sunny western elevation in Murrays Bay, the wall may be ready quickly. On the southern side of a house tucked behind hedging in Northcote, moisture can sit in the cladding and joints far longer than expected.
Weatherboards fail at the weak points
Timber weatherboards rarely fail evenly. The trouble spots are usually board ends, lower edges, horizontal laps, nail heads, and the bottoms of window trims where water sits longer.
Good prep means scraping back every loose edge to sound material, then sanding it so the repair disappears under the finish instead of telegraphing through it. Rusting nails need treatment before they bleed back through. Open joints and failed sealant need attention once the surface is dry and stable. Bare timber needs primer suited to exterior exposure, especially on older villas and bungalows where the boards have already moved through years of heat, damp, and repaint cycles.
Shortcuts fail for a simple reason. The topcoat only sticks as well as the layer under it. If the old film is chalking, if the edge is loose, or if salt is still sitting in the grain, the new coating has nothing reliable to hold onto.
Plaster, brick, and fibre cement each have their own rules
Plaster homes on the Shore often look straightforward because the walls read as one broad surface. In practice, they are less forgiving than timber. Hairline cracks, previous patching, and slight moisture entry all stand out once fresh paint goes on, especially in low winter light.
For plaster, open the crack and work out whether it is cosmetic or still moving. Use repair materials that suit exterior movement, sand the patch flat, then prime to even out porosity before topcoats. If that sequence gets rushed, the patch can flash, the crack can print through again, or the coating can trap moisture where it should not.
Brick needs a separate call. Previously painted brick can be recoated if the old system is sound and the wall is breathing properly. Bare brick is different. Painting it creates a maintenance cycle that does not go away, and any existing moisture issues need sorting first.
Fibre cement sits somewhere in between. It often holds paint well if the surface is stable, but edges, fixing points, and older patched areas still need close inspection.
If moisture cannot escape, the coating usually pays the price first.
Here's a useful visual demonstration of prep mindset and exterior process:
Cedar is where prep decisions get expensive
Cedar causes more false confidence than almost any other exterior. People see timber and assume it needs the same prep as painted weatherboards. It does not.
If the cedar is stained, decide first whether you are maintaining a stain system or converting to paint. Those are two different jobs with different prep demands. Weathered stain often absorbs unevenly, especially on the western and seaward faces, so patchy prep gives patchy colour straight away. If old coatings are breaking down badly or multiple systems are sitting on top of each other, simple sanding may not be enough. Anyone looking into difficult removals should understand the scope of paint stripping work on Auckland exteriors before deciding whether a simple repaint is realistic.
The prep sequence that holds up on the Shore
The order matters as much as the effort.
- Wash thoroughly to remove salt, mildew, chalking, and surface grime.
- Let the house dry properly, especially on shaded elevations and after winter washing.
- Scrape and sand every failing edge back to a sound feathered finish.
- Repair defects in timber, plaster, fibre cement, and sealant lines.
- Spot prime and full prime where needed on bare timber, patches, porous areas, stains, and suspect surfaces.
- Protect everything nearby before paint starts, including glass, hardware, paving, and planting.
That is the work that keeps a paint job alive in a coastal climate. The finish coat gets the compliments. The prep is what survives the salt, the damp mornings, and another Auckland winter.
Professional Application Techniques Tools and Safety
Application gets talked about more than prep because it's the visible part. Fair enough. But once the surface is ready, the method still matters. The wrong tool can leave a finish that looks rushed, wastes paint, or struggles on detailed areas.
The two main approaches are airless spraying and brush-and-roller application. Neither is automatically better. Each has a place.

Spray where it helps, brush where it matters
Spraying is excellent on large, open surfaces. New cladding, broad weatherboard runs, soffits, and some fences are good examples. It can lay down a smooth, even coat fast, especially when conditions are controlled and masking is thorough.
Brushes and rollers are slower, but they give better control around windows, corners, trims, and repaired areas. On repaints, they often help work paint into the surface more deliberately.
A simple comparison helps:
| Method | Best at | Watch out for |
|---|---|---|
| Airless spray | Speed and a uniform finish on broad surfaces | Overspray, poor control in wind, heavy application on edges |
| Brush | Cutting in, trims, detailed work | Slow progress on large areas |
| Roller | Even application on accessible surfaces, back-rolling after spray | Texture differences if used carelessly |
A lot of professional jobs use a combination. Spray the field. Brush or roll where precision is needed. Back-roll when the substrate benefits from it.
What separates a clean finish from a messy one
Technique shows up in small habits:
- Maintain a wet edge so lap marks don't build.
- Don't overload the tool because runs around weatherboard laps and trims are hard to hide.
- Follow the line of the substrate rather than forcing speed.
- Respect drying conditions before recoating.
The least experienced painters usually make the same mistakes. They chase speed, spread the paint too far, and assume a second coat will fix the first one. It won't fix drips, dry spray, or poor cutting in.
On exteriors, tidy work is usually slower work.
Safety isn't optional
Exterior painting looks manageable from the ground. It changes quickly once ladders, high gables, sloping paths, and spray equipment come into it.
Pay close attention to:
- Ladder setup: Stable footing matters more than confidence.
- Height work: Multi-storey elevations and stairwell drops are not casual DIY territory.
- Masking and overspray control: Cars, neighbour's property, roofing, and glass need proper protection.
- PPE: Masks, eye protection, gloves, and suitable clothing matter, especially when spraying or sanding old coatings.
The North Shore adds one more challenge. Wind can arrive halfway through the day and turn a controlled spraying setup into a poor decision. Good painters adapt fast. They switch methods, change elevations, or stop.
Estimating Costs Common Mistakes and Maintenance
A quote for a Milford weatherboard bungalow can look reasonable on paper, then climb fast once the wash reveals salt buildup on the seaward side, failed filler around window heads, and old paint letting go on the sunnier elevation. That is normal on the North Shore. Two houses with the same floor area can have very different repaint costs because exposure, access, substrate movement, and previous paint failure matter more than size alone.
In New Zealand, the average cost to paint the exterior of a standard single-storey home ranges from $4,000 to $10,000, with larger homes or more difficult conditions costing more, according to Davis Painters' house painting cost guide. On the North Shore, homes near the coast often sit toward the higher end because salt spray, damp shading, and extra preparation add labour before a topcoat even goes on.

Why one quote is cheap and another isn't
The cheapest quote is often the one that leaves out the work that keeps the paint on the house.
Preparation is usually 90% of the job. On the North Shore, that starts with washing off salt, grime, spores, and chalky residue. Then it moves to scraping, sanding, spot-priming bare areas, sealing gaps, and dealing with defects before they trap moisture under a fresh film. Skip those steps on a home in Castor Bay or Browns Bay and the coating can lose adhesion well before it should, especially on elevations that catch onshore wind and salt.
A low quote may allow for a basic wash and two coats. A higher quote may include timber repairs, rust treatment on nail heads, crack work on plaster, stain-blocking, more access equipment, and extra drying time between steps during an Auckland winter. That is a different scope, not just a different margin.
If you want a broader cost comparison, the Rescreen Rescue painting guide is a useful reference. If you are comparing local options, look closely at what is included in affordable house painting on the North Shore, especially the prep allowance, repair scope, and coating system.
The mistakes that cost more later
The expensive mistakes are usually made before the first full coat.
Treating prep as optional
Shortcuts fail fastest in a coastal climate. Salt sits on the surface, moisture lingers in shaded areas, and loose edges keep lifting under a new coat. Fresh paint cannot bond properly to contamination or unstable old film.Painting in marginal winter conditions
Auckland winters are not forgiving. If the substrate is cold, damp, or slow to dry after washing, the paint may stay soft, cure poorly, or trap moisture. North-facing walls can look ready while the southern side is still too wet to touch.Using a generic system on a specific substrate
Cedar, fibre cement, stucco, and old timber weatherboards all behave differently. A system that works on one can fail early on another, especially where movement, tannin bleed, or hairline cracking are already present.Underpricing repairs to win the job
Rotten scribers, failed sealant, rust bleed, and open joints do not disappear because a quote ignored them. They show up later as callbacks, staining, peeling, and water entry.Trusting appearance over moisture and condition
A wall can look sound from the driveway and still be carrying chalk, salt, or hidden failure around laps and trims.
I have seen plenty of North Shore repaints that looked tidy for six months and then started breaking down on the weather side. The pattern is predictable. Prep was rushed, drying time was guessed, or the house was painted to a price instead of to the condition of the substrate.
Maintenance that actually extends the finish
Maintenance is simpler than repainting, and it buys real time if it is done consistently.
Wash the exterior regularly, especially on seaward-facing sides where salt spray builds up. Check shaded walls for mould and damp staining. Keep an eye on sealant around windows, control joints, penetrations, and corners, because paint often fails there after water gets behind the film. Deal with chips, cracks, and small bare spots early.
On homes close to the coast, annual checks are sensible. On more sheltered streets farther inland, the interval can be a bit more relaxed. Either way, maintenance works best when it starts before the coating looks rough from the street.
The DIY vs Pro Decision A North Shore Perspective
A Milford homeowner can spend two long weekends repainting a sunny front elevation, stand back feeling good about it, then watch the south-west corner start blistering by winter. I have seen that pattern plenty of times on the North Shore. The paint was rolled on neatly enough. The failure came earlier, in the washing, drying, repairs, and timing.
That is the DIY versus pro question here. It is rarely about who can hold a brush. It is about who can read the substrate, allow for salt spray, work around damp winter conditions, and prepare the surface properly before the first coat goes on. On North Shore exteriors, preparation is 90 percent of the job because our coastal exposure punishes every shortcut. Salt left on the surface interferes with adhesion. Damp trapped under paint slows curing and leads to early peeling. Hairline cracks and failed sealant let water behind the film, especially on weather sides around Castor Bay, Murrays Bay, and other exposed streets.
When DIY is still realistic
DIY can make sense on a smaller, simpler house where the risks are controlled and the owner has the patience to do the slow parts properly.
It is usually realistic when the house has:
- Single-level access with flat ground and safe ladder positions
- Stable existing paint with only minor breakdown, not widespread peeling
- Limited repair work and no obvious decay, movement, or recurring leaks
- A straightforward substrate such as well-maintained timber weatherboards
- Flexible timing so the work can wait for a genuine dry window
The key trade-off is time. A homeowner can often do careful work on a manageable elevation, but only if they accept that washing, sanding, spot priming, filling, caulking, and drying checks take far longer than the topcoats. If the job has to be finished by Monday, DIY usually starts to unravel.
When a pro is the better option
Some houses expose every weakness in a DIY approach. Multi-storey homes in Torbay or Glenfield with awkward access, plaster cladding with recurring cracks, cedar that needs a full system reset, and older weatherboards with patch repairs all fall into that category.
Professional crews earn their keep on jobs like these because they can handle the parts that shorten paint life if they are guessed at:
- Access and fall protection on steep sites or high gables
- Accurate assessment of failed coatings so the new system matches the surface
- Moisture and weather timing during Auckland's colder, damp months
- Repair sequencing where rot, rust bleed, open joints, or failed sealant are already present
- Product selection for exposure on seaward-facing elevations that cop more salt than sheltered inland streets
Long-term maintenance also matters. Most homes in New Zealand need exterior repainting every 7 to 12 years, but painted weatherboard in coastal zones can drop to 7 to 10 years, while stained cedar may need reapplication every 2 to 5 years, according to HPS Build's guide to repainting exteriors in NZ. On the North Shore, those shorter cycles show up fastest on houses that sit in salt air and were painted without enough preparation.
A cheaper repaint can cost more over time if it fails early on the weather side and forces repair work into the next cycle. A well-scoped professional job costs more upfront, but on difficult houses it often buys a longer service life and fewer unpleasant surprises.
What to look for in a contractor
A good North Shore painter should be able to walk the house and talk plainly about failure points specific to your site. That includes exposure, substrate, access, repair scope, and the time of year the work is being done.
Ask direct questions:
- What washing and decontamination is included, especially on salt-exposed elevations
- What repairs are allowed for before painting starts
- Which primer and topcoat system will be used on your particular substrate
- How they decide whether winter conditions are suitable for each coat
- What happens if hidden defects show up once loose paint and failed sealant are opened up
If the main selling point is speed, be careful. The painters who do durable exterior work on the North Shore usually spend more time talking about surface condition, drying windows, and repair details than they do about how quickly they can finish.
If you want a preparation-led exterior repaint from a local team that understands North Shore salt exposure, damp winter constraints, and the difference between weatherboard, plaster, brick, and cedar, talk to Painters North Shore. They handle residential and commercial painting across Auckland's North Shore with detailed assessments, premium Resene and Dulux systems, and crews who know that a long-lasting finish starts well before the first topcoat goes on.