
You notice it while bringing the rubbish bins in. The north-west wall looks flatter and more washed out than it did last summer, while the sheltered side still appears perfectly respectable. A few window trims have lost their gloss, and one weatherboard joint is beginning to open. The house doesn't look ready for a complete repaint, but waiting until paint peels everywhere could leave the timber and joints exposed to Auckland weather.
That's why when to repaint a house on the North Shore isn't answered by one date. The right decision combines the coating's age, the substrate underneath it, the condition of each elevation, and how much salt, sunlight and wind-driven rain that surface receives. One wall may need a maintenance coat while the rest of the home remains sound.
Introduction Why Repaint Timing Matters More on the North Shore
A home in Devonport, Takapuna or Browns Bay can show different ageing patterns on every side. Sea-facing walls collect salt, windward elevations receive more driving rain, and north-west walls take strong afternoon sun. Walls sheltered by neighbouring buildings or verandas may still hold their colour and adhesion.
This difference affects what you repaint and when. A full-house repaint follows the condition of the property as a whole, while a maintenance coat may be needed on one exposed elevation years earlier. Treating every wall as though it faces the same weather can waste sound coating. Waiting until failure appears everywhere can let small defects around joints, trim, end grain and fasteners become routes for moisture into the substrate.
Paint-system life provides a starting point, not a fixed appointment. On timber weatherboards, a quality three-coat acrylic system is commonly given 7–10 years, while an oil-based or alkyd system may last 4–6 years. On metal, standard acrylic is often rated at 5–7 years, compared with 1–3 years for alkyd systems. These New Zealand guidance figures should prompt an inspection, alongside the NZ exterior paint guidance.
The practical rule: count the years since the last repaint to plan inspections. Use exposure and surface condition to decide whether the job is a full repaint or a targeted elevation coat.
Start by assessing each face of the house separately. Compare sun exposure, salt deposits, wind-driven rain and the condition of joins and trims. That simple check helps you choose between monitoring, local maintenance and repainting the entire exterior, while interior timing follows its own signs of wear.
How Paint Protects Your Home and Why It Eventually Fails
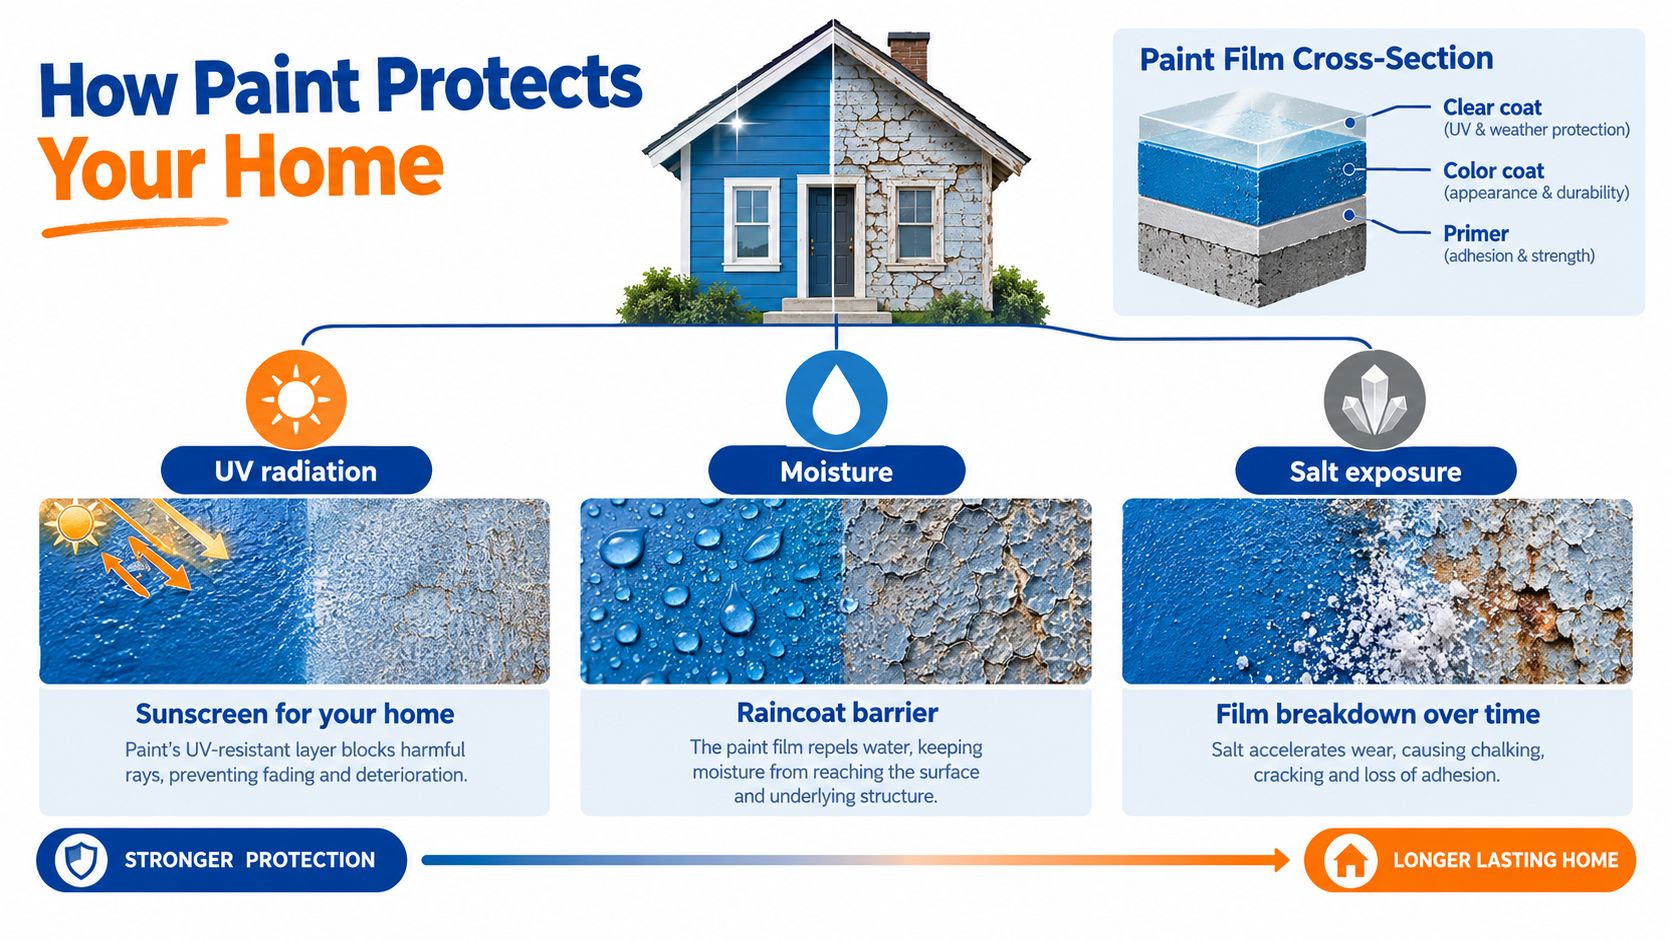
Exterior paint is a protective skin. It works much like sunscreen and a raincoat combined, reducing the effect of ultraviolet light while helping keep moisture away from timber, fibre cement, plaster and metal. The colour and sheen matter, but the coating's protective role matters more.
What wears out first
The film gradually loses flexibility and surface integrity. UV exposure can fade colour and make a coating more brittle. Moisture can enter through failed joints, cracks or exposed timber. Salt deposits attract moisture and leave a surface that deteriorates faster if homeowners don't wash it away.
The first signs are often easy to miss:
- Loss of gloss: A previously even finish becomes dull, especially on sun-facing walls.
- Chalking: A white powder transfers to your hand when you rub the surface.
- Fine cracking: Small lines appear in the paint film or around joins and trim.
- Joint movement: Sealant and paint no longer bridge gaps cleanly.
- Exposed edges: End grain, fasteners or bare substrate begin showing through.
These symptoms indicate that the coating is losing its ability to protect, even if large sections haven't peeled. Peeling is a later-stage failure, not the only signal that repainting is due.
Durability is a maintenance cycle
New Zealand building guidance treats durability as a planned lifecycle rather than a purely cosmetic choice. MBIE's building code framework uses commonly discussed 5-year, 15-year and 50-year durability categories, but exterior coatings on accessible surfaces are normally monitored and renewed before the underlying building element reaches those longer durability periods (MBIE durability framework and NZ maintenance guidance).
That distinction matters. Paint may fail while the timber remains repairable, or it may be left until moisture has damaged the material beneath. Washing, early touch-ups and sound preparation help keep the protective layer working for longer.
A good inspection therefore asks two questions: Is the coating still sound, and is the substrate still protected? If either answer is uncertain, arrange a closer assessment before deciding on a whole-house repaint.
Repaint Timelines by Surface and Coating System
A repaint schedule starts with two questions: what is the exterior made from, and which coating system is protecting it? Painted weatherboards do not age like cedar, plaster, fibre cement or metal. Even on one house, a north-west elevation may need a maintenance coat years before a sheltered side, so a whole-house timetable should not replace elevation-by-elevation inspection.
New Zealand guidance gives these broad exterior windows:
| Substrate and System | Typical Repaint Window | What Shortens It |
|---|---|---|
| Timber weatherboard, quality three-coat acrylic | 7–10 years | Salt air, UV, driving rain, poor preparation and neglected washing |
| Painted cedar | 7–10 years | Coastal exposure, strong sun and finish breakdown |
| Plaster or stucco | 7–9 years | Cracking, moisture movement and exposed elevations |
| Fibre cement | 10–12 years | Weather exposure, joint failure and surface deterioration |
| Metal, standard acrylic | 5–7 years | Salt, corrosion risk and unsuitable preparation |
| Metal, alkyd system | 1–3 years | Coastal weathering and earlier coating breakdown |
| Timber, oil-based or alkyd system | 4–6 years | UV, moisture and movement in the substrate |
Independent New Zealand exterior guidance places weatherboards and cedar in the 7–10 year range, plaster or stucco at 7–9 years, and fibre cement at 10–12 years (NZ exterior repaint timing by substrate). These are planning ranges, not promises. An exposed wall can deteriorate sooner, while a protected elevation may remain sound longer.
Why preparation changes the outcome
Paint works like a protective skin. It cannot stay sound over salt, dirt, dampness or unstable material. Washing removes grime and coastal residue. Scraping and sanding remove loose coating. Filling, sealing and priming create a stable base for the finish coats.
A quality three-coat acrylic system on prepared timber will generally provide a more durable result than an ageing alkyd system, but the specification still needs to suit the substrate and exposure. The coating system is only one part of the result. Preparation and ongoing washing determine how long that system can keep working.
For weatherboard owners, this guide to choosing paint for NZ weatherboards explains product selection, preparation and finish considerations. Metal requires a separate assessment for corrosion, failed fasteners and coating adhesion. Powder-coated components also need a different maintenance approach from ordinary painted weatherboard. FenceScape's powder coating and painting guide explains why the existing finish affects the work required.
Use the upper limit as a warning
The top of a range is a prompt to inspect, not permission to wait. As timber approaches 7–10 years or metal nears 5–7 years, arrange an assessment before coating failure spreads (NZ coating life guidance).
A full-house repaint may still be unnecessary at that point. If the sheltered elevations remain sound, a maintenance coat on the exposed north-west or coastal-facing walls can protect the home while keeping the broader repaint plan practical. Assess the coating, substrate and exposure together before choosing between local maintenance and a complete repaint.
Coastal and Weather Effects That Shorten Repaint Cycles
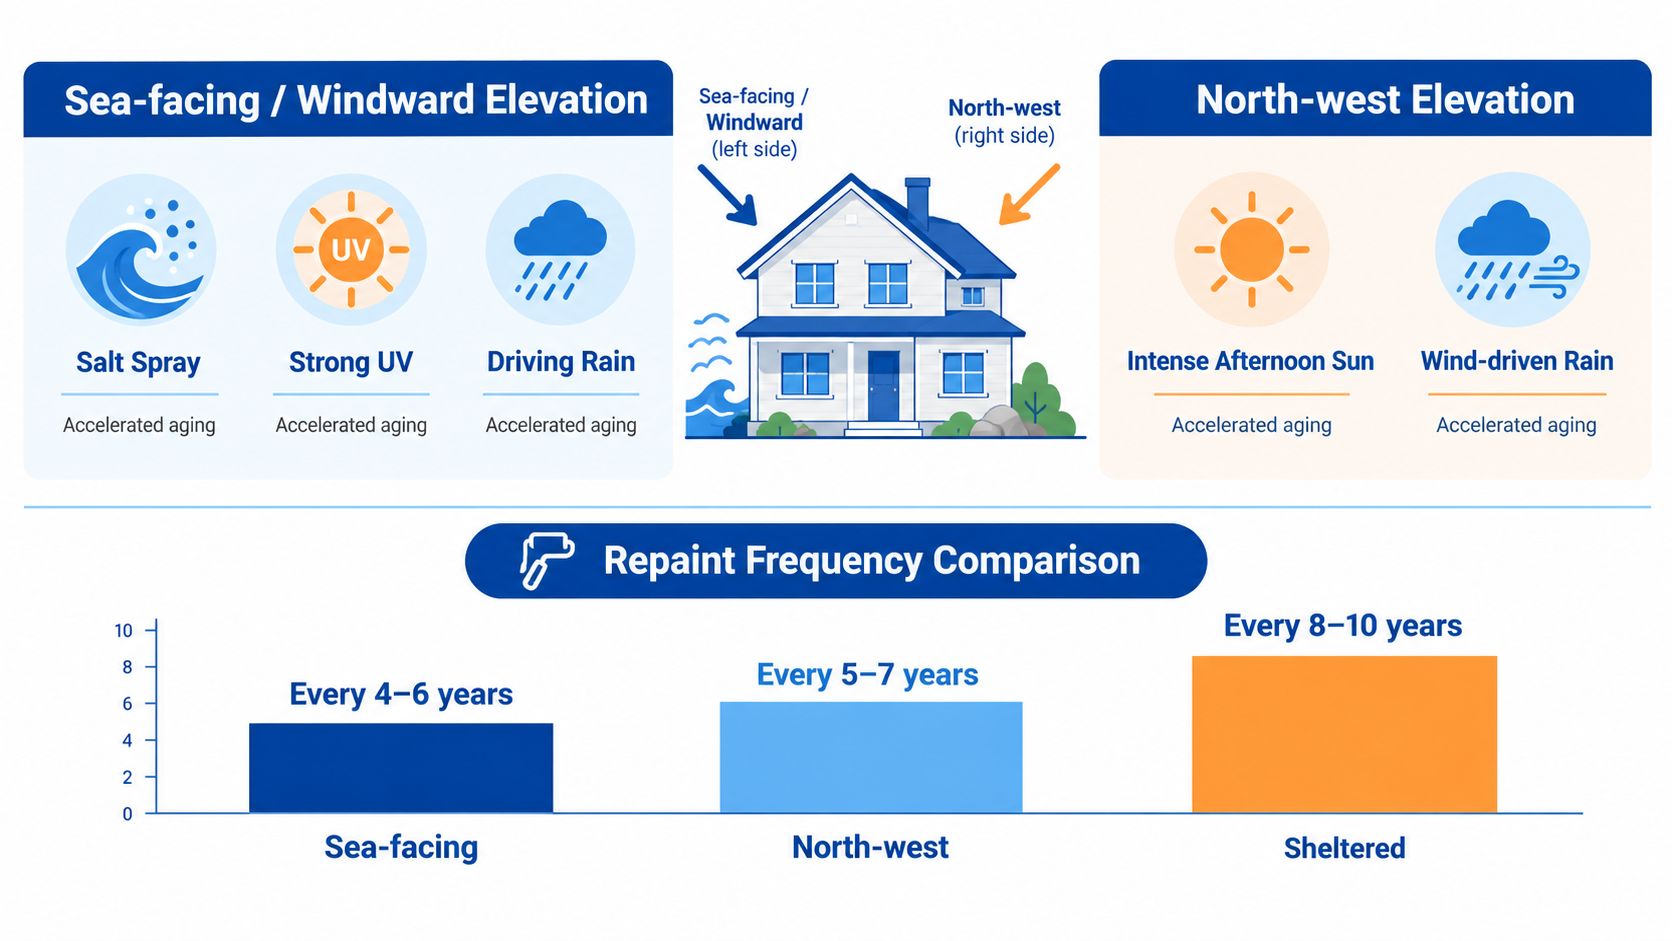
A home on a sheltered North Shore street may keep a sound finish while the same home's sea-facing or north-west wall begins to fade and chalk. Repaint planning therefore works best elevation by elevation, rather than treating the whole exterior as if it experiences the same weather.
Open-water and windward walls receive salt spray, driving rain and stronger gusts. North-west walls also take intense afternoon sun, which can reduce colour and gloss sooner. Sheltered elevations receive less direct exposure, so they may still look healthy even when exposed sides need a maintenance coat.
New Zealand maintenance guidance places a well-washed, maintained exterior at around 8–12 years, while exposed sea-facing surfaces may need attention in about 5–7 years (NZ maintenance-cycle guidance). These ranges describe different exposure levels and maintenance histories. They do not mean the entire house must be repainted as soon as one elevation shows wear.
Read the house by elevation
Begin with the wall facing the strongest weather, then compare it with a sheltered side. Check:
- Colour: North- and west-facing surfaces often fade first.
- Surface feel: Chalking shows that the paint film is breaking down.
- Gloss: A dull section can indicate earlier coating wear.
- Joints and trim: Wind-driven rain targets weak points around windows and penetrations.
- Timber edges: End grain and exposed joins need protection before they take in moisture.
Dark colours create another maintenance consideration. Guidance from Painters North Shore identifies colours with an LRV below 25% as potentially needing repainting at about 7 years, while lighter colour systems may be easier to maintain (North Shore exterior painting guidance). Dark cladding absorbs more heat, adding stress to sun-facing surfaces. That does not set a fixed repaint date, but it makes regular inspection more useful.
Washing is part of the repaint cycle
Salt can affect a coating before obvious staining appears. Gentle washing removes deposits and gives you a chance to find chalking, mildew, failed sealant and fine cracks early. Level and NZ maintenance guidance recommends washing weatherboards at least six-monthly, with more frequent care in severe coastal exposure (weatherboard maintenance guidance).
Use a method suited to the coating and substrate. Excessive pressure can drive water into joints or damage a weakened film. For safe access and practical cleaning methods, these CA window cleaning tips for homeowners also offer useful reminders for checking nearby exterior surfaces.
Signs It Is Time to Repaint Inside and Outside
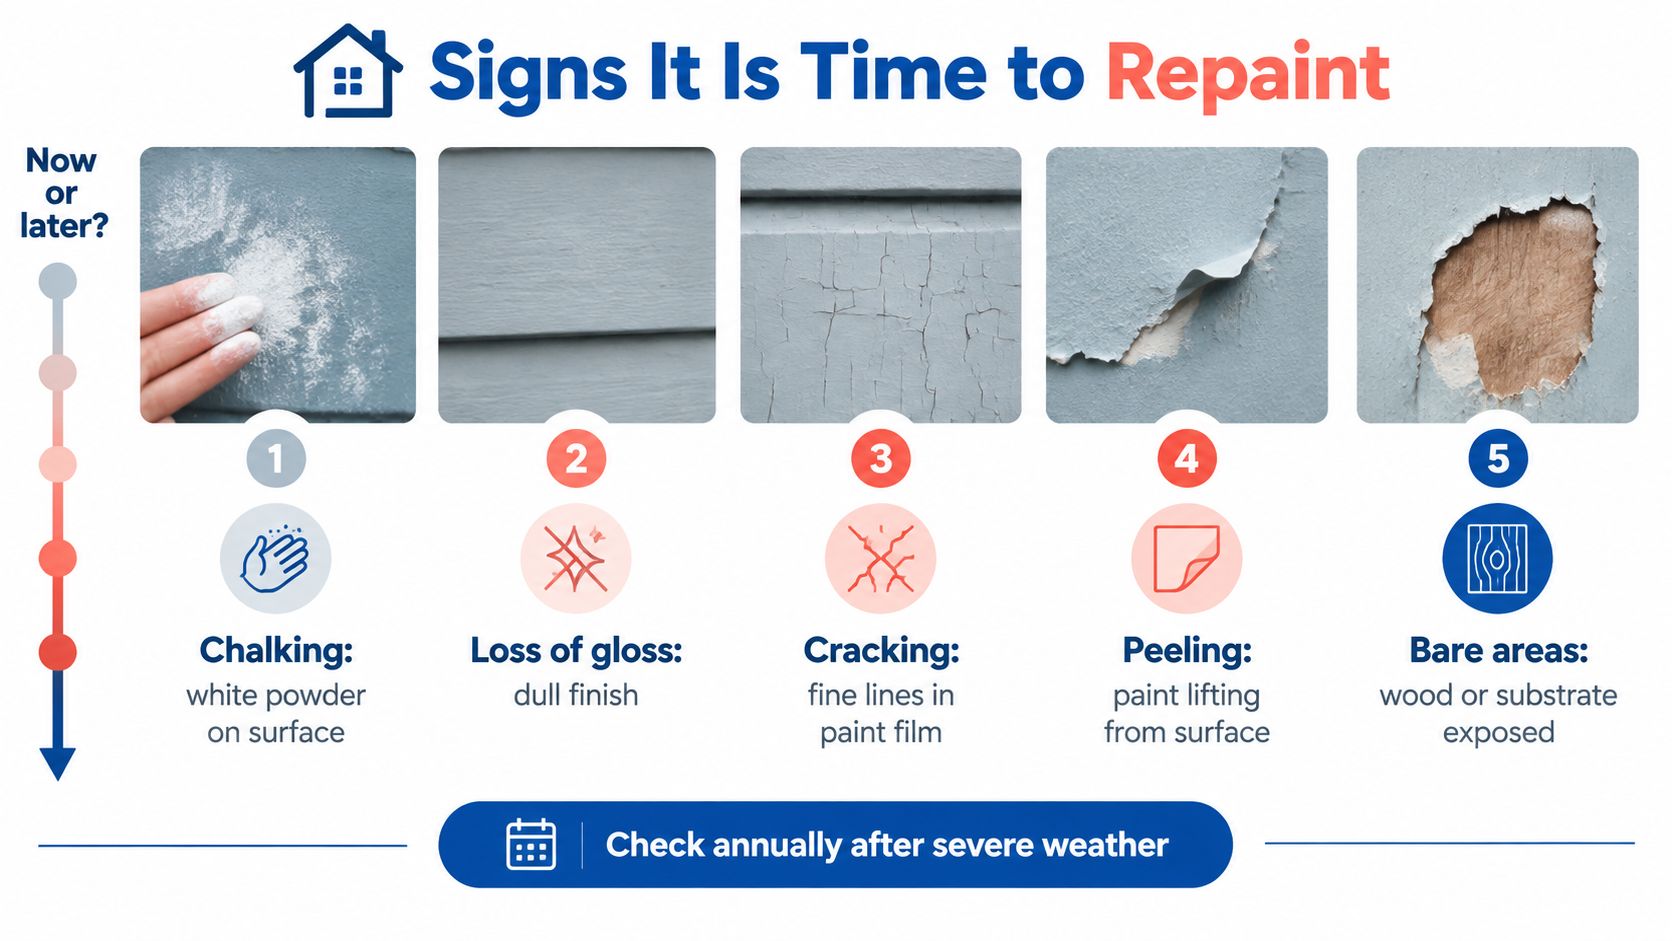
The best time to repaint is usually before the most dramatic damage appears. A wall covered in peeling flakes has already passed several earlier warnings. Check the finish in good daylight, then inspect shaded areas, trim, joints and places where water may sit.
Start with the subtle signs
Run a clean hand over an inconspicuous area. White residue indicates chalking. Compare the finish with a protected section under an eave or veranda. If one elevation has become noticeably dull or faded, it may need a maintenance coat even when the rest of the exterior still looks sound.
Then inspect the film closely. Fine cracks around weatherboards, window trim or plaster details can admit water. Open joints, failed sealant and exposed end grain deserve prompt attention because they affect the building envelope, not just its appearance.
Protection comes first: repaint when the coating no longer reliably protects the surface, not only when peeling has spread across the wall.
Serious exterior failure
Flaking and peeling mean adhesion has been lost in places. Scraping and recoating without identifying the cause can lead to repeat failure, particularly where moisture enters from behind or where the substrate moves. Bare timber, exposed fibre cement, rusting metal or damaged plaster should be assessed before selecting a coating.
A practical exterior inspection sequence is:
- Walk the perimeter: Check each elevation separately, including walls hidden from the street.
- Look upward: Examine soffits, fascia, upper trim and areas below gutters.
- Check water paths: Note staining, mildew, failed sealant and damp-looking joints.
- Test carefully: Rub for chalking and look for loose edges, but don't damage a sound finish.
- Record priorities: Photograph exposed walls and note whether the problem is isolated or widespread.
Interior warning signs
Interior repaint timing follows use and room conditions more than salt exposure. Scuffs in hallways, marked doors and worn trim may call for a targeted refresh. Kitchens and bathrooms need closer attention to moisture marks, yellowing, mildew and areas where condensation affects adhesion.
A ceiling stain isn't solved by paint alone. Find and repair the leak or moisture source, allow the surface to dry, then use the appropriate preparation and primer before repainting. The same principle applies to bubbling or lifting paint. Stabilise the surface first, or the new finish will inherit the old problem.
Planning Your Repaint Schedule and Maintenance Checklist
A repaint plan should distinguish between routine care, elevation-specific maintenance and full-house renewal. This prevents a sheltered wall from setting the timetable for a north-west or sea-facing elevation that is wearing faster. It also avoids treating one faded section as proof that the entire exterior needs repainting.
Start with a simple property record. Note the last exterior coating system, if known, the substrate on each elevation, the colour and any previous repairs. Mark the sea-facing, north-west and sheltered walls separately. Photos taken from the same positions during each inspection make gradual fading easier to compare.
Choose the right level of work
- Monitor: The coating is intact, without meaningful chalking, cracking or exposed substrate.
- Maintain: One elevation or several trim elements show early wear, while the wider system remains serviceable.
- Repaint fully: Several elevations have lost protection, or isolated work would create preparation or colour differences.
- Repair first: Moisture, movement, corrosion or substrate damage is present beneath the coating.
Washing belongs on the maintenance calendar. Weatherboards need regular cleaning, and homes exposed to strong sea spray may require inspection and washing every 3–4 months. Use a soft-wash method suited to the finish, then arrange repairs if you find failed caulking, mildew or open joints.
Make the schedule practical
Inspect north-west and sea-facing elevations after harsh weather and during routine maintenance. A maintenance coat on one exposed elevation may be appropriate years before a full-house repaint. Schedule broader work when several surfaces approach the service window for their substrate and coating system, rather than waiting for the most sheltered side to fail.
Colour selection should follow the same exposure review. Dark finishes can need earlier recoating on high-sun walls, while lighter colours may reduce heat and ultraviolet stress. For roof coatings and access considerations, the Commercial Roofers guide offers useful background. The roof system still needs to suit the actual material and site conditions.
Before work starts, confirm the preparation scope, coating system, repairs, access, colour and finish. An itemised estimate should separate washing, scraping, sanding, filling, priming, sealing and topcoats. That makes proposals easier to compare than a final colour or total alone.
Interior work can be scheduled around household use. Repair wall damage, clean high-contact areas and check kitchens, bathrooms and ceilings for moisture before selecting a finish. The wall preparation guide explains how surface preparation affects adhesion and appearance. Repainting only the worn rooms may make more sense than placing every interior space on one timetable.
Next Steps for a Longer Lasting Repaint
The most economical repaint is rarely the one scheduled only after widespread peeling. Regular washing, elevation-by-elevation inspections and early repairs help keep the substrate protected and give the next coating a sound base. That matters particularly on North Shore homes exposed to salt air, strong sun and driving rain.
Use the age of the existing system as a prompt, not a verdict. A timber weatherboard exterior approaching its recognised service window deserves inspection, but a fading north-west wall may need work sooner than a sheltered elevation. Inside, focus on scuffs, moisture marks, worn trim and adhesion problems rather than repainting every room on the same timetable.
When you request an assessment, ask for an elevation-by-elevation condition review, a clear preparation specification and an itemised estimate. Colour consultation can also help you balance appearance, sunlight, substrate and future washing requirements. Premium Resene or Dulux systems may be appropriate, but the product should match the surface and the preparation should match the exposure.
If you're seeing chalking, fading, cracking or open joints, act before the coating reaches failure. An on-site inspection can clarify whether you need a targeted maintenance coat, repairs followed by repainting, or a coordinated interior and exterior project.
Painters North Shore provides on-site assessments, preparation-led interior and exterior painting, colour consultation, and itemised written estimates for North Shore properties. Visit Painters North Shore to arrange an inspection and find out what needs attention now, what can wait, and how to plan a longer-lasting repaint.


