You've probably got the samples on the bench, a room that looked easy on paper, and one wall that's turned into a mess of bubbles, lifted edges, or a crooked start line that bugs you every time you walk past it. That's the point where most Auckland homeowners realise wallpaper isn't a “slap it up and hope” job. It's a surface job, and if the wall isn't right, the finish won't be right.
In Auckland, that matters more than people want to admit. Villas, renovated plasterboard, coastal damp, old patches, and mixed repairs are common across the North Shore and wider city, so the wall under the paper often decides the outcome before the first strip goes on. If you're comparing wallpaper hangers Auckland options, judge them on how they read the wall, not how glossy the portfolio looks.
Why Auckland Homes Need Professional Wallpaper Hangers
A North Shore owner rings up because the new feature wall looked fine for the first hour, then the seams started to show, the corner folded back, and the paper near the window felt loose. That's not bad luck. That's a wall condition problem that was ignored before the job started.

Auckland homes throw up three common headaches. Older villas often have patchy substrates and old surface repairs. Renovated homes can hide uneven plasterboard joints. Coastal properties bring moisture stress into rooms that look dry on the surface.
DIY fails where the wall is unforgiving
The paper itself is only part of the job. Pattern repeat, seam placement, trimming around architraves, and matching the first drop all need a steady hand, but failures usually start underneath. A poor surface will show through, even if the hanging looks neat on day one.
Auckland history backs that up. A late-1970s study by the New Zealand Institute of Architects reportedly found wallpaper could save homeowners up to 5% a year in winter heating in the pre-double-glazing era, which explains why paper stayed attractive in local homes. A 2009 Auckland survey by Mitre 10 found 67% of first-time wallpaper hangers said they would never do it again (source). That's not a small grumble, that's a clear warning.
Practical rule: if the wall is cracked, chalky, patched, or damp, don't treat wallpapering as the first trade on site.
That's why I tell homeowners not to buy hanging by the hour or by the roll. Buy judgement. A decent installer sees the wall, knows what will fail, and stops the job becoming expensive twice.
What Professional Wallpaper Hangers Do
Wallpaper hanging looks simple from a distance. Paste, line it up, smooth it down, trim the edges, job done. Any installer who thinks the job starts there is already behind, because the wall decides how clean the finish will be long before the paper goes up.
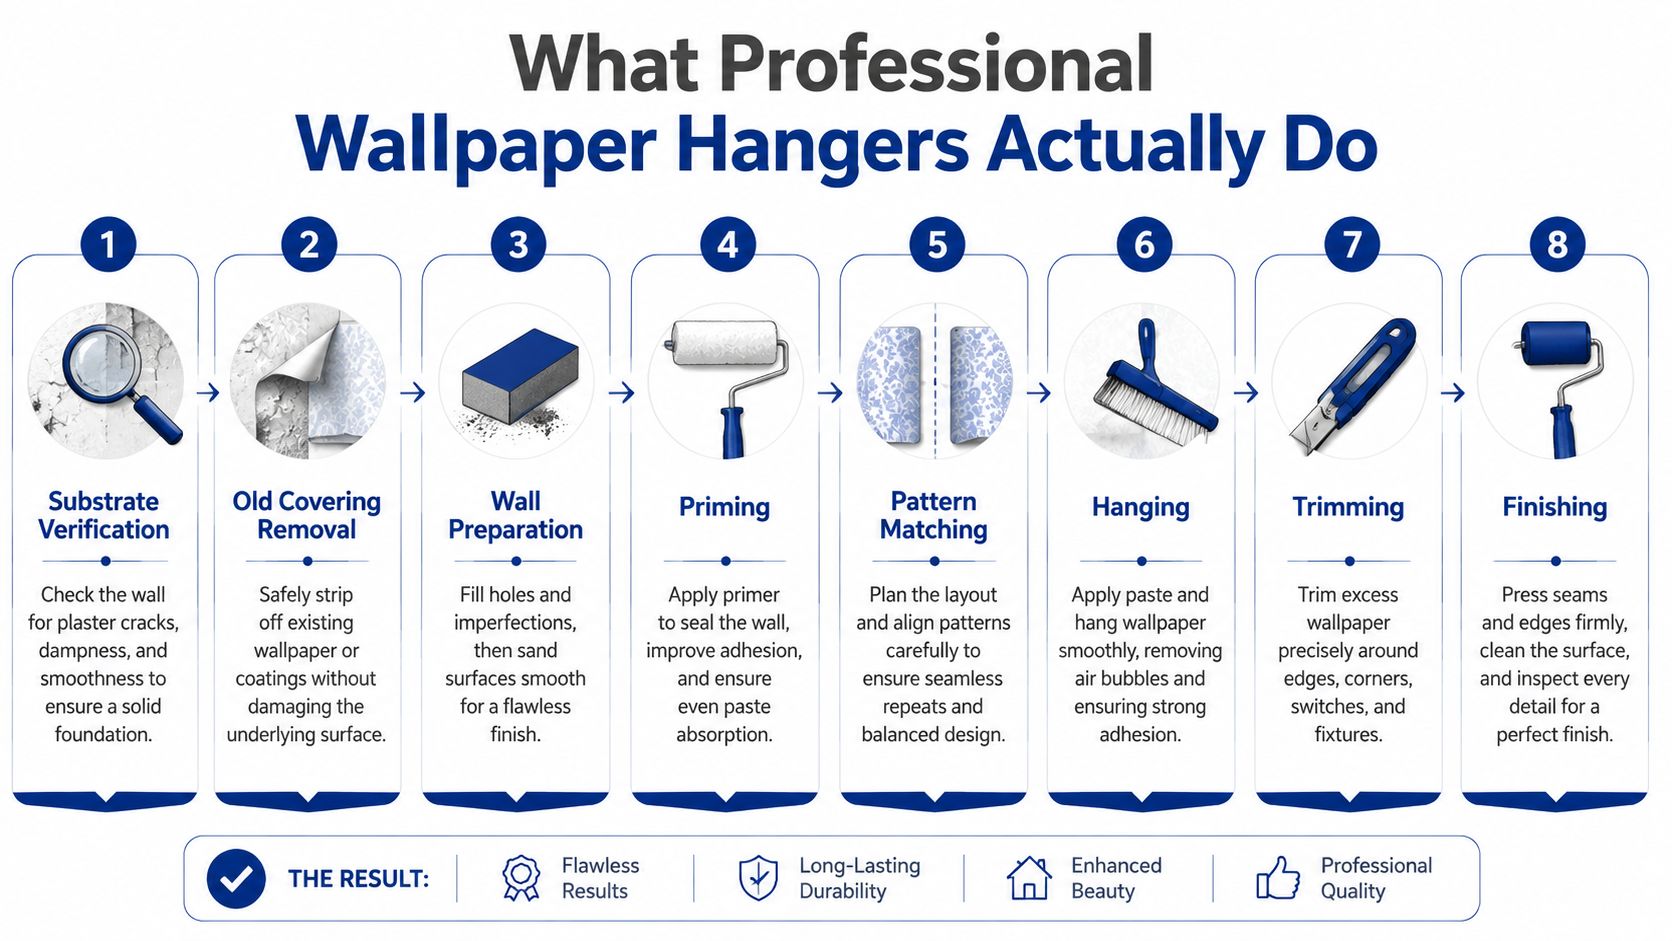
The sequence that protects the finish
A proper job starts with substrate verification. The installer checks whether the wall is plasterboard, plaster, concrete, or a patched mix, because each surface takes adhesive and preparation differently. After that comes removal of the old covering, a stage many homeowners try to rush through, even though a poor removal leaves the next finish exposed to every defect underneath.
Then comes crack repair, sanding, cleaning, and priming or sealing. Auckland service providers set out that order clearly, including checking rolls from the same batch, measuring the first drop carefully, and levelling before adhesive goes on (Seab Painting wallpapering process). The order matters because the first strip controls the rest of the room. If that first line is off, every seam after it looks wrong.
Main takeaway: the biggest failure usually starts under the paper, not on top of it.
Different wallpaper types need different adhesive and substrate prep, especially vinyl, textured, or custom-printed papers in rooms that deal with humidity or heat. If someone only talks about getting the paper up straight and never mentions sealing, patching, or wall porosity, they are not pricing or planning the job properly. They are treating a preparation job like a quick hanging task.
For visual ideas before you commit to a bold surface, the Melbourne feature wall inspiration page gives a good sense of how a feature wall can change a room. Use it for layout ideas, not as a shortcut around wall prep. Style comes after substrate, not before.
If you want to see the process in motion, the sequence in the infographic shows how a clean start line, sound joints, and careful trimming keep the room from looking rushed.
Good installers do more than hide flaws. They sort out the causes of failure before the first strip goes up.
How to Vet Wallpaper Hangers Based on Wall Condition
Forget the usual sales talk about how long they've been in the trade. Ask what they think of your walls. If they can't talk clearly about substrate, moisture, or patch quality, keep looking.
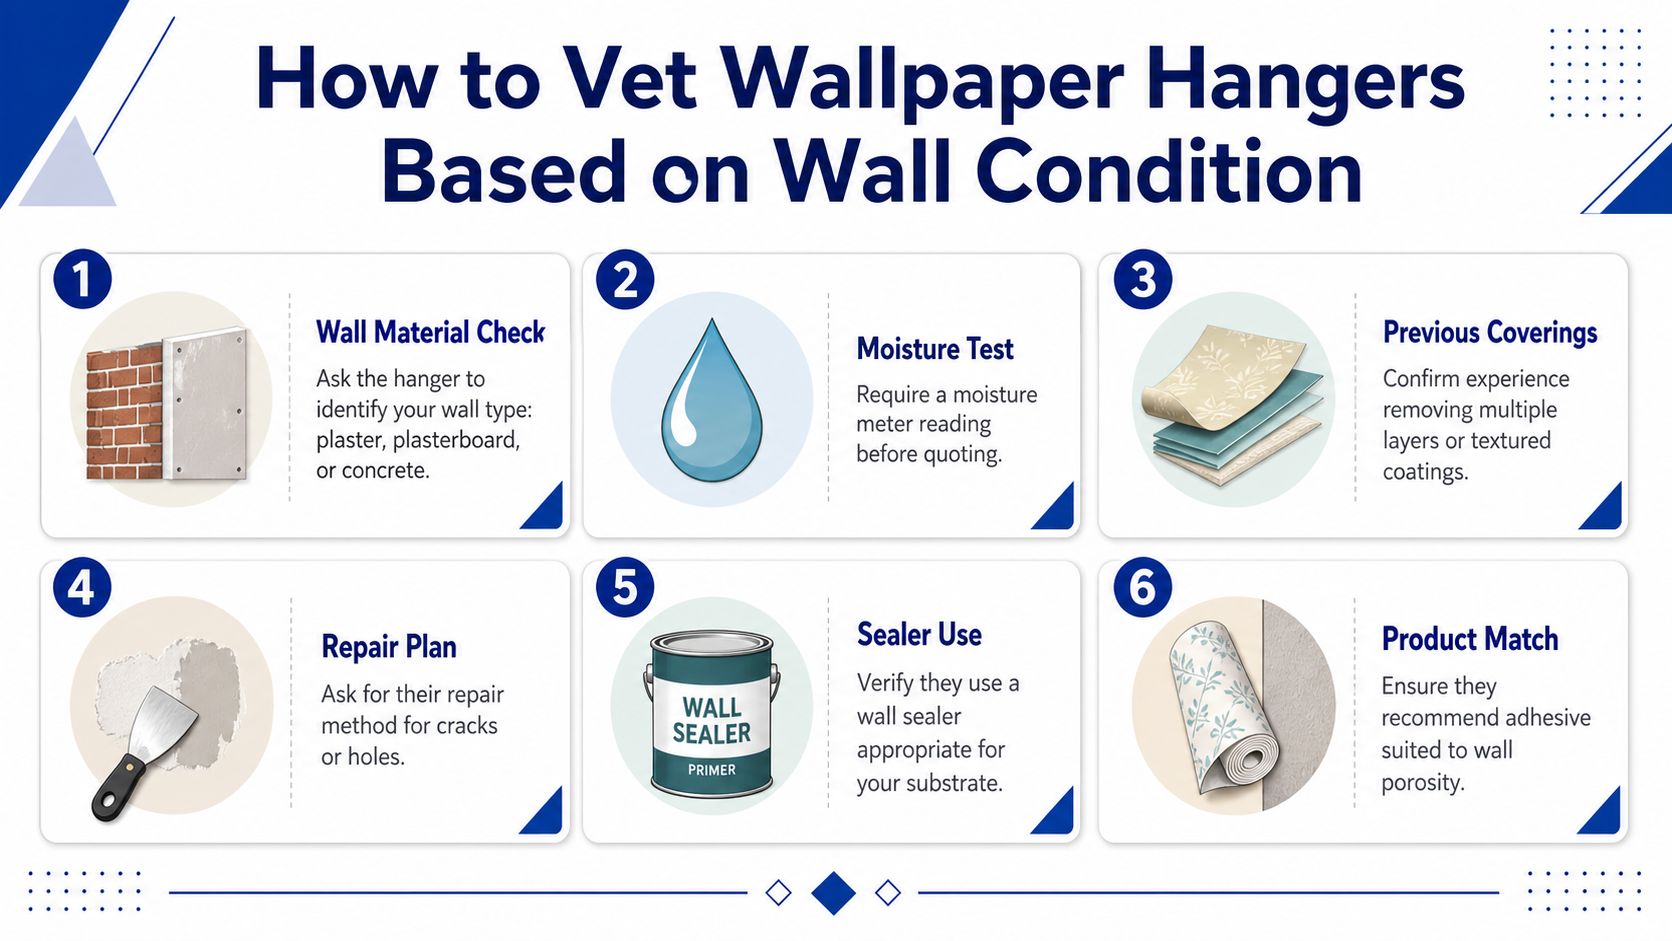
Questions that expose real expertise
Start with the wall material. Ask whether they've identified plaster, plasterboard, or concrete, because each one behaves differently under paste and pressure. If they shrug and say they'll “sort it on the day,” that's not confidence, that's laziness.
Then ask about moisture. A serious installer should be able to explain how they deal with damp or unstable rooms before quoting. If the wall has old covering layers, textured coatings, or dodgy repairs, they should have a removal and repair plan, not just a hanging plan.
Use these checks:
- Wall material clarity: Ask them to name the substrate and explain why it matters for prep.
- Moisture awareness: Ask what they'd do if the wall shows signs of dampness or poor drying.
- Removal experience: Ask how they handle multiple layers or stubborn old finishes.
- Repair method: Ask whether they skim, fill, sand, or postpone until the wall is fixed.
- Sealer choice: Ask what wall sealer they'd use on your substrate.
- Adhesive match: Ask how they choose paste for the wallpaper and wall porosity.
A good quote should mention sealing, patching, and any lining or repair work that's needed before paper goes up. If it doesn't, the installer is pricing only the hanging, not the outcome. That's a bad deal dressed up as a cheap one.
This is also where a proper prep-first contractor earns trust. Painters North Shore offers wall repair, priming, and painting services that sit neatly alongside wallpaper preparation, which matters when the wall needs fixing before any decorative finish goes on. If the person quoting your paper job can't talk about repairs in plain English, they're not ready for an Auckland house.
Typical Pricing and Timelines for Auckland Wallpaper Projects
I'm not going to pretend every wallpaper job fits neatly into a tidy box. It doesn't. A small feature wall on clean plasterboard is a very different animal from a full room with old paper, cracks, and awkward corners.
| Project Type | Typical Cost Range (NZD) | Expected Timeline |
|---|---|---|
| Single feature wall | Varies by wall condition and paper type | Usually a short, same-day job if prep is light |
| One standard room | Varies by room size and surface repairs | Often a one-day to two-day project |
| Full house or multi-room installation | Varies widely with prep, access, and paper selection | Usually staged over multiple days |
| Removal only before reinstall | Varies by layers, adhesive residue, and wall damage | Depends on how much prep the wall needs |
The biggest cost driver is not the paper. It's the wall. A clean, flat, sealed substrate saves time. A damaged, porous, or previously papered surface adds labour before any decorative work begins. Vinyl, textured, and custom-printed wallpapers can also take more care because alignment and handling are less forgiving.
If a quote seems too low, ask what's missing. Usually it's prep, removal, or sealing. If a quote seems high, check whether it includes repairs, detailed setup, and the sort of care that prevents a callback later.
A transparent estimate should spell out what's included, such as:
- Removal of existing covering
- Patching and sanding
- Priming or sealing
- Hanging and trimming
- Cleanup and final check
For a useful comparison point on interior work pricing, see the interior house painting prices guide. Wallpaper isn't paint, but the same rule applies, good prep costs less than fixing a failure.
Preparing Your North Shore Home for Wallpaper Installation
Before the installer arrives, clear the room properly. Don't make them lift furniture around your sofa, boxes, and kid's gear. That wastes time and makes a neat job harder to do.
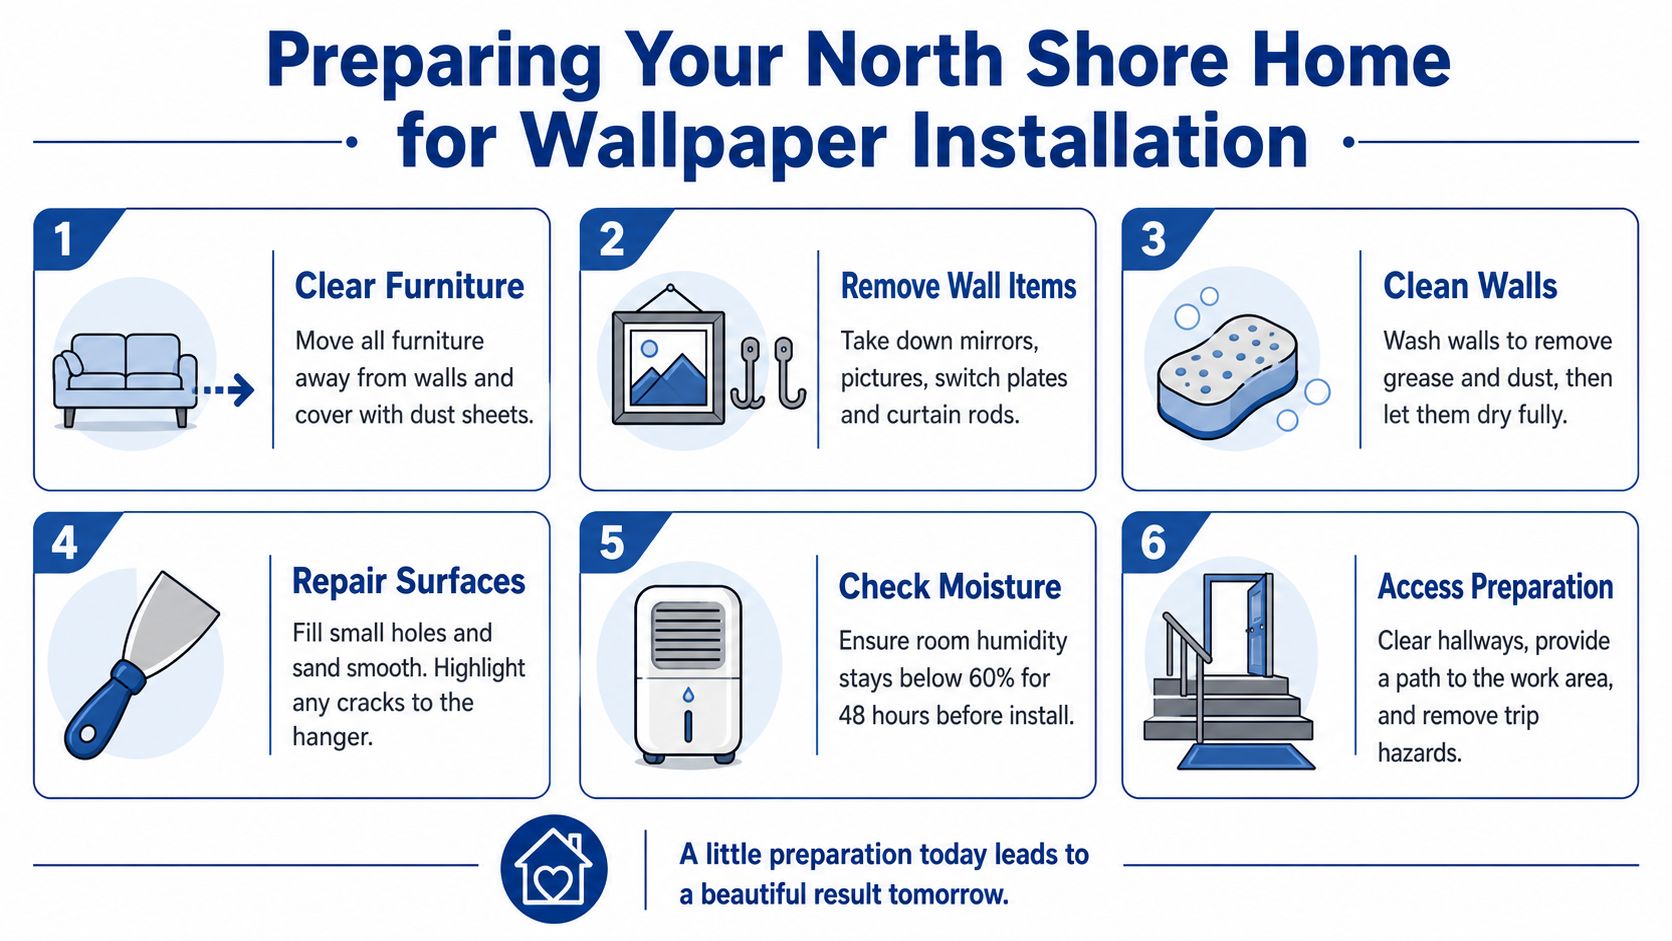
What homeowners should do first
Strip the room back as far as you can. Remove mirrors, picture frames, hooks, curtain rods, switch plates, and anything fixed to the wall. If the room is on the North Shore and close to the coast, keep an eye on humidity and give the room time to dry properly before install day.
If you're dealing with an older property, don't try to “tidy up” cracks with random filler and hope for the best. Mark them and tell the hanger. Badly sanded repairs are worse than no repair at all because they create lumps under the finish.
A practical checklist:
- Clear furniture: move everything away from the walls and cover it.
- Remove wall items: take down fittings, art, and hardware.
- Clean surfaces: wash off dust and grease, then let walls dry.
- Highlight damage: point out cracks, dents, and past repairs.
- Check moisture: make sure the room is dry and stable.
- Clear access: open up hallways and entry paths.
If wallpaper removal is still on the table, don't assume it's the cheapest route to a fresh room. Sometimes the old surface is too tired, too patched, or too unstable. In those cases, fix the wall first, then decide whether wallpaper still makes sense. The how to prep walls for painting guide is useful here because the same prep discipline applies before paper goes on.
How Painters North Shore Supports Your Wallpaper Project
Wallpaper and paint aren't rivals. They're part of the same wall-finishing decision, and the smart move is to treat them that way. If one wall needs repair, sealing, or a full visual reset, the right choice might be paint on some surfaces and wallpaper on a feature wall.
The prep-first method matters here. Wash the wall, sand the rough spots, fill the defects, prime the substrate, and mask the surrounding surfaces before any finish goes on. That sequence keeps the paper from sitting over dust, loose filler, or uneven patches, and it also makes adjacent trim, ceilings, and skirting look clean beside the new wall covering.
There are jobs where paint is the better call. A low-light room with rough walls, a rental that needs easy maintenance, or a space with repeated moisture issues can be easier to handle with a solid paint system than with wallpaper. That's not backing away from wallpaper. It's choosing the finish that matches the wall.
For broader repair and finish support, see the plastering and painting services page. That matters because a wallpaper outcome is only as good as the surface work behind it, and a contractor who handles repairs, priming, and painting can help you make the right call before any paper is ordered.
If you want straight advice on wallpaper hangers Auckland homeowners can trust, talk to Painters North Shore before you buy paper or book the install. They handle the prep, repairs, priming, and finishing that decide whether a wallpaper job looks sharp or starts failing early. Visit Painters North Shore and ask for an assessment based on your actual wall condition, not just the wallpaper you've got in mind.